1. Major Anderson
Even after moving his command from Fort Moultrie to Fort Sumter, Major Anderson was aware of how precarious his situation was. He had plenty of experience in earlier wars, but already he knew that if – nay, more likely when – Beauregard attacked him, it would be different. He knew that Beauregard knew how to properly attack a fort – he himself had taught him the skill. And he didn't doubt that Beauregard was well equipped from the US military installations that had already fallen. But this war would be different for another reason too – it would be fought far closer to home. He had seen the destruction of war, and this was not a thought he relished. He would do his part to minimize it's destruction. He only hoped others would do the same.
-
principes romanes
- Sergeant
- Posts: 89
- Joined: Tue Oct 11, 2016 9:32 pm
- Location: Genève
The Coming Fury: A Union AAR by principes romanes
Currently writing:
The Coming Fury - an excessively detailed AAR on Union strategy
The Coming Fury - an excessively detailed AAR on Union strategy
-
principes romanes
- Sergeant
- Posts: 89
- Joined: Tue Oct 11, 2016 9:32 pm
- Location: Genève
2. Welcome!
Welcome to this AAR! It has been awhile since there has been a detailed AAR so I figured I might as well write one. I have a few goals from writing this. The first is fun! Hopefully this will both be fun for me to write and fun for you to read. The second is to poke at a few of the different elements of the game – to look a bit at how various elements of the game affect the decisions I make. Related to that, I certainly hope that you can learn something from reading this, even if it is just how to lose with grace. I am not an experienced player – this is my first PBEM.
Despite my introductory post, I will be focusing much more on strategy and tactics considerations than historical perspectives. I don't think I have the knowledge to do the latter very well and the former interests me enough anyway.
Finally, I will be lagging this AAR a couple of turns behind where we are in the game. The main reason for that is to ensure that I don't change my orders or moves based on any comments or feedback. I would love for this AAR to generate discussion, but I don't want it to give me an advantage over my opponent. Similarly, if people post comments on specific game mechanisms (i.e. something about frontage), I will share those comments with my opponent.
Currently writing:
The Coming Fury - an excessively detailed AAR on Union strategy
The Coming Fury - an excessively detailed AAR on Union strategy
-
principes romanes
- Sergeant
- Posts: 89
- Joined: Tue Oct 11, 2016 9:32 pm
- Location: Genève
3. Settings
We are playing with fairly standard PBEM settings. Essentially the one unusual setting is Foreign Intervention set to easy. I'm sure that seeing the French and British involved would make for a very exciting AAR.
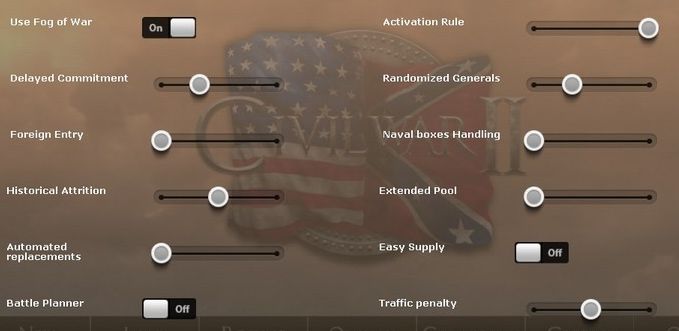
We haven't established any house rules, but I have indicated that I plan to stay within the bounds of what is historically credible. I assume my opponent will too.

We haven't established any house rules, but I have indicated that I plan to stay within the bounds of what is historically credible. I assume my opponent will too.
Currently writing:
The Coming Fury - an excessively detailed AAR on Union strategy
The Coming Fury - an excessively detailed AAR on Union strategy
-
principes romanes
- Sergeant
- Posts: 89
- Joined: Tue Oct 11, 2016 9:32 pm
- Location: Genève
4. Initial Strategy Considerations – How the Union can lose
The Union has a lot of advantages. Initially, the Union has almost every advantage except 1) generalship and 2) being on the defensive.
A useful starting point is to consider how I think the Union is likely to lose. They are:
1) An early military defeat
The Union can be fairly vulnerable early in the game. Losing Washington early would be costly and likely difficult to overcome. Early in the war when the forces are smaller, I think it is easier to have unpredictable battle results. Also, there are likely to be more holes in the defensive lines early in the war that forces can move through. Until the capital defences are established, a small force – perhaps a large division under Jackson – can pose a threat to Washington. Defending Washington is important.
The Union does need to watch other areas early too – Cairo, St. Louis, and possibly Louisville are all potential targets.
2) National Moral
Technically, the only ways to actually lose are based on national moral or, at the end, victory points. But really by this, I mean that the Union mostly risks losing on national morale in 1864 when they have a relatively high NM floor to maintain. There are two considerations for this though. The first is that national moral does recover over time. At 75NM, I believe I can expect return to normal to give me, on average, +1 NM per turn. That means that I can safely lose about 1 NM per turn, or 24 NM per year, and stay at about the same place. As such, I probably should not be too hesitant to spend national moral on taxing and recruiting early in the war.
The ideal is of course to raise it – I would feel comfortable with it in the mid 80s. Anything higher and I'm probably outright happy.
3) Foreign Intervention
I have never actually seen foreign intervention. Suffice it to say though, adding the British and French would definitely make this game far more complicated. With easy FI, this occurs when FI reaches 75. In practice, if FI gets close to that I expect my opponent would play the political options that give it a boost, even at the cost of lots of NM. So I probably want to keep FI under 50 to be comfortable.
Other than specific events and political options, FI moves based on victory points and NM. There is a chance each turn that FI moves 1 point in favour of the person with the lead in each category. I believe that the chance is 50%. If the Confederates have both leads, that is an average of +1 FI each turn, or +24 FI in a year. The major variable though is what happens with events, which makes FI unpredictable. If all three of blockade, embargo, and the Trent affair go against me, I suspect FI is possible as early as mid to late 1862. If one of those breaks in my favour, I suspect I am fairly comfortable until at least early 1863.
This suggests though that I should aim for the VP lead or NM lead by early 1863 to stabilize the threat of FI. Of the two, gaining the VP lead seems like an easier goal.
Currently writing:
The Coming Fury - an excessively detailed AAR on Union strategy
The Coming Fury - an excessively detailed AAR on Union strategy
-
principes romanes
- Sergeant
- Posts: 89
- Joined: Tue Oct 11, 2016 9:32 pm
- Location: Genève
5. Initial Strategy Considerations – What to Do
5. Initial Strategy Considerations – What to Do
The Union has lots of options. The key limitation though is that you cannot do everything. I suspect that it is possible to capture Atlanta by late '61 or early '62 by attacking up the Appalachicola or Oconee rivers. It is just that the force required to hold it would seriously weaken other fronts. The other limitation – if that is the right word – is that the Union does need to attack. It is possible to sit tight in 1861 and attack later in the game, but that is also less fun. Also, it won't get me the VP lead that I want. So I really see this as a question of where do I want to attack.
1) Virginia
This is the area that ultimately has the greatest reward for a successful attack – namely, Richmond. [1] It also has the greatest penalties if you don't attack, with the large losses to NM by event. It is therefore also the Confederates' best defended theater. Actually winning here will require a lot of resources.
There are a few advantages of attacking early here:
i) You can avoid the events that trigger NM losses.
ii) Entrenchments are much weaker earlier in the game. This means the defender will not have as big a combat advantage in early battles.
iii) It is easier to flank early in the game, especially before corps with MTSG. This makes it potentially easier for the attacker than the defender to concentrate forces.
There are also a few disadvantages:
i) You have a massive inferiority in leaders. It probably isn't as bad though in 1861 as 1862 because the Union leaders don't improve much in 1862 but the Confederacy gets Lee, Jackson and Longstreet.
ii) Command penalty. The penalty in combat usually cancels out, but the command penalty still means you will move slower on the attack.
iii) You have fewer reserves to protect Washington from a counter-attack.
2) West Virginia
The major Union advantage here is much better supply lines. The Confederates also do not have the same leadership advantage here that they have in other theaters. Morgantown is also a strategic city, so it is likely worth a bit of effort to capture sooner rather than later. Your victorious troops can move on to either help in the valley, in Kentucky, or to threaten the Knoxville railway line.
3) West
There are ultimately a few potential avenues of attack. One is through Kentucky to Nashville. Another is along the Tennessee and Cumberland Rivers through Forts Henry and Donelson. Another is down the Mississippi. And the fourth is overland to Springfield and Fayetteville. Many of these defensive positions can be well defended. However, the challenge for the South is that it is very hard to defend all of them well. Maintaining flexibility in deciding where to attack can help avoid needing to assault a very well defended position.
The rivers here are another consideration. The Confederacy has a fairly strong river fleet. The Union naval superiority can also be heavily curtailed if the Confederates can defend, or even build a fort at, Paducah. If Kentucky doesn't secede, it might be worth violating its neutrality to capture and secure Paducah.
Another consideration is that your opponent will eventually start sending raiders at you. Numerous gunboats can help prevent raids. Controlling Kentucky and Missouri also means raiders must travel further before they can get at juicier targets.
One interesting – and very gutsy move – to take out Kentucky early would be to sail a fleet past Fort Donelson and land a force in Gallatin, TN. If you block the river crossings with a navy, then the Confederates have a long march around the flank to try to attack you. Your biggest threat is likely the Confederate river fleet beating up on your spread out fleet that is already damaged from running the guns past the fort.
4) Far West
The Confederacy has an advantage in irregulars. The Union usually has an advantage in regular troops, especially once a few reinforcements arrive.
The two main options here are to either try to defend – and therefore also be able to attack – or to implement much more of a scorched earth policy, ensuring that it is very difficult for your opponent's raiders to do damage. While there are a few strategic and objective cities, the biggest resource is the gold mines, which produce a large proportion of the Union's regular money. Additionally, there are a lot of stockades in this theater, and capturing each one provides a few VPs.
The biggest challenge for both players operating here is supply. You will need a fairly robust supply network even to be able to sustain your starting forces. As such, a scorched earth policy really does make attacking very difficult.
Another challenge in this theater is that its remoteness often makes it hard to respond quickly to enemy moves. If the enemy does try to send a large force to California, it will take a long time to send a response.
The final consideration is that it is usually not a good idea to invest a large number of resources here – the game will not be won or lost in big battles in this theater (although, if the South capturing even the gold mine near Denver is a swing of about 20$ / turn).
5) Coastal Operations
Player opinion seems to vary a lot on the utility of coastal operations. On the one hand, there is a long coastline with many of the South's most important cities. It is hard for the Confederacy to effectively defend all of them. Attacks here have the potential to do a lot of damage economically and can be hard to repulse. On the other hand, the Union often needs to send a large force to be able to effectively defend gains against a counter-attack – say the Army of Northern Virginia sending Longstreet's core to retake Norfolk. Even if the Confederates do not counter-attack, it can tie up a lot of force on garrison duty. Taking coastal forts is also a possibility. They are often easier to defend, not only for the fortifications but also because they are not on railways. In theory, many of them contribute to the blockade through distant blockade events. It seems though that in a PBEM, most of the distant blockades do not work properly (http://www.ageod-forum.com/viewtopic.php?f=331&t=50889&p=388918#p388918).
[1] New Orleans is definitely comparable and may arguably be worth even a bit more economically. But if you take Richmond, your opponent had to spend the cost of moving the capital (or let you get the capital capturing benefit).
Currently writing:
The Coming Fury - an excessively detailed AAR on Union strategy
The Coming Fury - an excessively detailed AAR on Union strategy
-
principes romanes
- Sergeant
- Posts: 89
- Joined: Tue Oct 11, 2016 9:32 pm
- Location: Genève
Re: The Coming Fury: A Union AAR by principes romanes
This project is on hold for the next week or so during exam season.
Currently writing:
The Coming Fury - an excessively detailed AAR on Union strategy
The Coming Fury - an excessively detailed AAR on Union strategy
-
principes romanes
- Sergeant
- Posts: 89
- Joined: Tue Oct 11, 2016 9:32 pm
- Location: Genève
6. Initial Strategy Considerations – Objectives for 1861
Initial Strategy Considerations – Objectives for 1861
The risk is that I try to do everything. The purpose of establishing these objectives is to ensure that I remain focused on what I should actually be achieving and don't get distracted by – oooo, shiny – I mean, chasing raiders all over the map.
1) Defend Washington
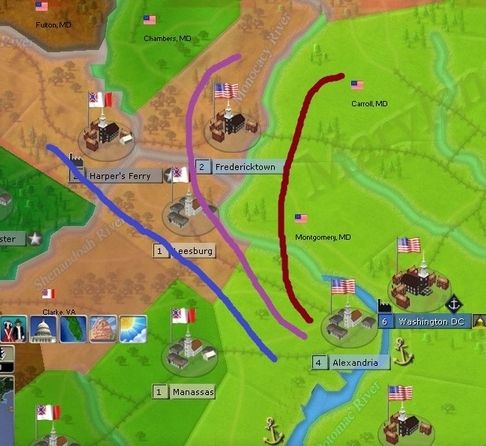
There are two parts to this. The first is to ensure that I have a large enough force in the area. My ideal is to outnumber my opponent by 2:1 on the front lines, plus have some reserves. A realistic goal is probably a 1.75:1 advantage, and a minimum of 1.5:1. The second is to maintain a front line far enough away from Washington. My ideal is Alexandria, Leesburg, and Harper's Ferry. I also imagine that is his ideal defensive line, and that Harper's Ferry in particular will be hard to get. Fredricktown is a good fallback position from Harper's Ferry. Falling back to Alexandria, Montgomery, and Carroll is less desirable, and not only because it is closer to Washington. While Montgomery and Carroll still have the benefit of being behind rivers, they are both open terrain that can allow the Southern leadership to shine. Although the same could be said for Northern canons... Anyway, Montgomery and Carroll will both receive stockades and small forces to build entrenchments. If Alexandria falls, I will also want brigs on the Potomac to prevent crossings into Washington and Charles.
My specific objectives are to:
i) Defend my forward line.
ii) Build stockades and trenches on the rear defensive lines.
While it is possible to move the capital if it is threatened, that actually does include a significant FI (+15) hit as well as the better known money and NM costs (and a small VP cost).
2) Capture and secure Paducah, KY
Securing Paducah ensures that the Union river fleet is able to act as a single body and is not cut in two. It allows far more flexibility with amphibious operations. It allows for more effective river defence, allowing the fleet to concentrate if there is a strong Confederate fleet but also allowing the fleet to easily peel off units to block river crossings. Furthermore, holding Paducah makes it highly unlikely that the Confederates will build a fleet to challenge the Ohio, Tennessee and Cumberland rivers. If the Union fleet is divided, it becomes a very credible risk that the (hopefully) smaller Confederate fleet can effectively challenge the Union fleet.
The objective is to secure Paducah if Kentucky secedes.
3) Capture Springfield or Bowling Green
Essentially this objective is to make significant progress in either Kentucky or Missouri. Realistically, it is likely that Kentucky will still be neutral or have only recently seceded, making Springfield the more likely target. Whichever one I target, I will also want to capture the remaining cities in the state to deny my opponent one of those large build pools. I am willing to revise this target to Island 10 or Forts Henry and Donelson if the opportunity arises, although I expect both of those to be harder battles.
Actually capturing any of these objectives in 1861 will be ambitious. My goal is to be adjacent, and therefore threatening, at least two of them.
4) Secure West Virginia
I would like the VPs from Morgantown and the ability to threaten the Knoxville railway can tie down a few enemy resources. Although it is possible to adopt a strategy of committing enough resources to ensure a significant numerical advantage and then to reassign them after I win, I prefer to start by committing relatively few troops. I also want to destroy the depot in Morgantown to make supply as much of a challenge as possible in the theater.
My goals are
i) Retain control of Morgantown
ii) Ensure that all Confederate forces are South of the B&O Railroad
5) Burn the Far West
Burning as many stockades and settlements in the far west as possible appears to be the most risk adverse strategy. It will make it very hard for my opponent to capture the goldmines, at least so long as they remain loyal to me. There is a significant risk that my NM forces encounter supply problems. I will likely build them a depot to tide them over once the Regional Development Card becomes available in January. Ultimately, my supply solution in this theater is to link up with the California Column and establish a supply line to California.
My goals are
i) Ensure that goldmines remain well protected, especially against attacks that rely on low loyalty.
ii) Destroy enough stockades to make an enemy advance logistically challenging.
6) Coastal Operations
I have a few goals from coastal operations. The first is to secure important cities – essentially strategic and objective cities, especially those that produce significant amounts of money. In addition to securing these resources for myself, I want to deny them to my opponent. Second, I want to tie down enemy troops, ideally using as few of mine in the process as possible without leaving myself vulnerable. Third, I would really like a port where my ships can recover hits in the Gulf. That means a size 3+ harbour. There are also a few minor benefits from operating in the theater. I can gain VPs from capturing structures and beating up on garrisons. I can gain experience for generals I want to promote, especially from capturing forts. Florida, Texas, and possibly Lousiana are all small enough and close enough to the coast that capturing them early may deny him the full build pool those states provide, although I suspect the Confederates would only really miss the LA troops.
My specific objectives therefore are to:
i) Have 3 brig squadrons constantly probing his coastline to gather information on potential landing spots. These units will either encourage him to constantly react (doubtful) or allow me to send scouting missions ahead of actual landings without generating suspicion.
ii) Capture a size 3+ Gulf harbour that I am able to defend. In 1861, that is most likely somewhere in Texas. This will be the major landing I plan for 1861.
iii) Conduct a few minor raids. Although I doubt I will hold them long, they can contribute a point or two to the blockade and retaking many of those likely will actually tie up my opponent's force for longer than my initial raid took.
7) Navy
The navy risks becoming a big money sink. I am certainly leery of over-investing here. It does though have its uses. I want it to support coastal operations, although this requires relatively few resources unless I am aggressively running coastal forts. I want it to contribute to the blockade. I don't plan to enhance the blue water blockade but I would like to engage in a bit of brown water blockading. I want control of the rivers, which means I need to invest a bit in the river navy. I want the river navy to be able to block his navy and potentially prevent some river crossings. I would also consider running the guns at Fort Donelson. Finally, a strong navy will be very helpful if FI actually does occur. In order to keep this investment reasonable, I do not plan to spend more than 10% of my money on non-land combat troops.
My specific objectives are
1) Ensure clear river superiority, including being able to cover when I send ships back to port for repairs and recovering cohesion.
2) Implement one brown water blockade.
3) Avoid spending more than 10% of my money on purchases other than infantry/cavalry/artillery.
8) Miscellaneous
i) Economic Growth
Essentially my other goal is to raise economic production. My direct options for economic production are industrialization and shipping. I will eventually be able to build 48 transports at $20 each for a total cost of $980. When I put most of that in the shipping box, and combine it with the merchant shipping, I get about $100 per turn and about 50 WS, depending on how many raiders there are. That means I'm spending about 10x the money I make in one turn (This is a very rough estimate – somebody could easily test it more rigorously).
I could instead invest in industry. The chart below provides a (very crude) estimate of how many turns it takes for different industry options to break even. In fact, I am pretty sure that resources production is restricted to integers – I think that introduces a margin of error of about 50% in my illustrations. Again, there is an opportunity for a more rigorous analysis.
[Edit: I am not convinced that this economic analysis is actually accurate enough to be helpful]
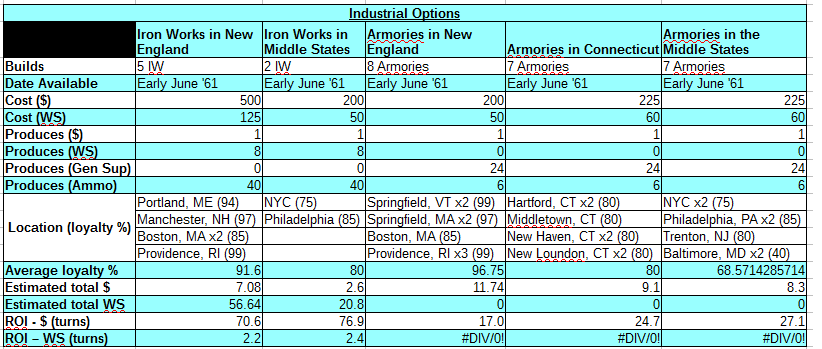
I draw a few conclusions from this analysis. First, shipping appears to be a wiser investment than industry, at least initially. Second, the Union can ramp up WS production almost overnight by building Iron Works.
Note: There is a rumour that industry starts producing the turn it appears on the map, even though it still shows as under production. I believe though that there is still a 1 to 3 turn lag between ordering the industry and it actually appearing on the map. Even so, industry seems to have the advantage that it starts producing slightly faster than the transport that is definitely not producing while it is still under construction.
Note 2: Industry production is definitely affected by loyalty and national moral (and I think this is actually reflected in the numbers the structures on the map indicate that they produce). I honestly have no idea if shipping is. I suspect that the loyalty bonus will mostly be slightly bigger than the NM penalty on resource production, which may give industry a slight bonus.
Note 3: Shipping has the advantage that it allocates its production between $ and WS based on which is less plentiful (this is not quite the same thing as which you need more – I would almost always prefer that my shipping produced more $ and less WS). Industry does not have this flexibility.
Note 4: The pricing for the NE England Armories looks like it might be an error, especially since it is identical to the Middle States Iron Works price.
My objective is to build the New England Armories early. I want to increase shipping somewhat – a target of 25$ / turn seems reasonable. I want to build a second set of armories if the loyalty in the target region is high enough to justify it (at least half the target cities over 85% to protect against demonstrations).
ii) Loyalty
I have a few objectives from boosting loyalty. One is to protect against some regional decisions. Loyalty over 50% prevents my opponent from playing partisans or copperheads. Realistically, this is mostly a concern in the Far West where those forces can be a serious threat to gold mines. Elsewhere, it is mostly just annoying. Loyalty over 85% protects against demonstrations too. High loyalty also enhances production, with each 10% increase in loyalty increasing production by 5% (side note – I don't know if this only applies above 50% loyalty or if there is actually a penalty on the base production with loyalty under 50%). Loyalty over 50% also limits my opponent's ability to gain free intel on the region. If the South has a general in the theater that increases detection (and I believe there area few), I believe my opponent can get a detection value of three in these regions, allowing significant intel behind my lines. Finally, loyalty above 50% facilitates guarding cities. It both protects them from raids and also allows me to gain victory points from them without garrisoning regular troops in them.
My objective is to have all of New York, Philadelphia, Washington and Boston with loyalty above 85% and Baltimore with loyalty above 50% by the end of 1861. In addition to a few Habeas Corpus cards, I plan to send Butler (with his hated occupant) to these cities with a few cavalry regiments. Ideally I also want all of the gold mine regions to have loyalty above 85% but I will satisfy myself with a minimum goal of 50%.
The risk is that I try to do everything. The purpose of establishing these objectives is to ensure that I remain focused on what I should actually be achieving and don't get distracted by – oooo, shiny – I mean, chasing raiders all over the map.
1) Defend Washington
There are two parts to this. The first is to ensure that I have a large enough force in the area. My ideal is to outnumber my opponent by 2:1 on the front lines, plus have some reserves. A realistic goal is probably a 1.75:1 advantage, and a minimum of 1.5:1. The second is to maintain a front line far enough away from Washington. My ideal is Alexandria, Leesburg, and Harper's Ferry. I also imagine that is his ideal defensive line, and that Harper's Ferry in particular will be hard to get. Fredricktown is a good fallback position from Harper's Ferry. Falling back to Alexandria, Montgomery, and Carroll is less desirable, and not only because it is closer to Washington. While Montgomery and Carroll still have the benefit of being behind rivers, they are both open terrain that can allow the Southern leadership to shine. Although the same could be said for Northern canons... Anyway, Montgomery and Carroll will both receive stockades and small forces to build entrenchments. If Alexandria falls, I will also want brigs on the Potomac to prevent crossings into Washington and Charles.
My specific objectives are to:
i) Defend my forward line.
ii) Build stockades and trenches on the rear defensive lines.
While it is possible to move the capital if it is threatened, that actually does include a significant FI (+15) hit as well as the better known money and NM costs (and a small VP cost).

2) Capture and secure Paducah, KY
Securing Paducah ensures that the Union river fleet is able to act as a single body and is not cut in two. It allows far more flexibility with amphibious operations. It allows for more effective river defence, allowing the fleet to concentrate if there is a strong Confederate fleet but also allowing the fleet to easily peel off units to block river crossings. Furthermore, holding Paducah makes it highly unlikely that the Confederates will build a fleet to challenge the Ohio, Tennessee and Cumberland rivers. If the Union fleet is divided, it becomes a very credible risk that the (hopefully) smaller Confederate fleet can effectively challenge the Union fleet.
The objective is to secure Paducah if Kentucky secedes.
3) Capture Springfield or Bowling Green
Essentially this objective is to make significant progress in either Kentucky or Missouri. Realistically, it is likely that Kentucky will still be neutral or have only recently seceded, making Springfield the more likely target. Whichever one I target, I will also want to capture the remaining cities in the state to deny my opponent one of those large build pools. I am willing to revise this target to Island 10 or Forts Henry and Donelson if the opportunity arises, although I expect both of those to be harder battles.
Actually capturing any of these objectives in 1861 will be ambitious. My goal is to be adjacent, and therefore threatening, at least two of them.
4) Secure West Virginia
I would like the VPs from Morgantown and the ability to threaten the Knoxville railway can tie down a few enemy resources. Although it is possible to adopt a strategy of committing enough resources to ensure a significant numerical advantage and then to reassign them after I win, I prefer to start by committing relatively few troops. I also want to destroy the depot in Morgantown to make supply as much of a challenge as possible in the theater.
My goals are
i) Retain control of Morgantown
ii) Ensure that all Confederate forces are South of the B&O Railroad
5) Burn the Far West
Burning as many stockades and settlements in the far west as possible appears to be the most risk adverse strategy. It will make it very hard for my opponent to capture the goldmines, at least so long as they remain loyal to me. There is a significant risk that my NM forces encounter supply problems. I will likely build them a depot to tide them over once the Regional Development Card becomes available in January. Ultimately, my supply solution in this theater is to link up with the California Column and establish a supply line to California.
My goals are
i) Ensure that goldmines remain well protected, especially against attacks that rely on low loyalty.
ii) Destroy enough stockades to make an enemy advance logistically challenging.
6) Coastal Operations
I have a few goals from coastal operations. The first is to secure important cities – essentially strategic and objective cities, especially those that produce significant amounts of money. In addition to securing these resources for myself, I want to deny them to my opponent. Second, I want to tie down enemy troops, ideally using as few of mine in the process as possible without leaving myself vulnerable. Third, I would really like a port where my ships can recover hits in the Gulf. That means a size 3+ harbour. There are also a few minor benefits from operating in the theater. I can gain VPs from capturing structures and beating up on garrisons. I can gain experience for generals I want to promote, especially from capturing forts. Florida, Texas, and possibly Lousiana are all small enough and close enough to the coast that capturing them early may deny him the full build pool those states provide, although I suspect the Confederates would only really miss the LA troops.
My specific objectives therefore are to:
i) Have 3 brig squadrons constantly probing his coastline to gather information on potential landing spots. These units will either encourage him to constantly react (doubtful) or allow me to send scouting missions ahead of actual landings without generating suspicion.
ii) Capture a size 3+ Gulf harbour that I am able to defend. In 1861, that is most likely somewhere in Texas. This will be the major landing I plan for 1861.
iii) Conduct a few minor raids. Although I doubt I will hold them long, they can contribute a point or two to the blockade and retaking many of those likely will actually tie up my opponent's force for longer than my initial raid took.
7) Navy
The navy risks becoming a big money sink. I am certainly leery of over-investing here. It does though have its uses. I want it to support coastal operations, although this requires relatively few resources unless I am aggressively running coastal forts. I want it to contribute to the blockade. I don't plan to enhance the blue water blockade but I would like to engage in a bit of brown water blockading. I want control of the rivers, which means I need to invest a bit in the river navy. I want the river navy to be able to block his navy and potentially prevent some river crossings. I would also consider running the guns at Fort Donelson. Finally, a strong navy will be very helpful if FI actually does occur. In order to keep this investment reasonable, I do not plan to spend more than 10% of my money on non-land combat troops.
My specific objectives are
1) Ensure clear river superiority, including being able to cover when I send ships back to port for repairs and recovering cohesion.
2) Implement one brown water blockade.
3) Avoid spending more than 10% of my money on purchases other than infantry/cavalry/artillery.
8) Miscellaneous
i) Economic Growth
Essentially my other goal is to raise economic production. My direct options for economic production are industrialization and shipping. I will eventually be able to build 48 transports at $20 each for a total cost of $980. When I put most of that in the shipping box, and combine it with the merchant shipping, I get about $100 per turn and about 50 WS, depending on how many raiders there are. That means I'm spending about 10x the money I make in one turn (This is a very rough estimate – somebody could easily test it more rigorously).
I could instead invest in industry. The chart below provides a (very crude) estimate of how many turns it takes for different industry options to break even. In fact, I am pretty sure that resources production is restricted to integers – I think that introduces a margin of error of about 50% in my illustrations. Again, there is an opportunity for a more rigorous analysis.
[Edit: I am not convinced that this economic analysis is actually accurate enough to be helpful]

I draw a few conclusions from this analysis. First, shipping appears to be a wiser investment than industry, at least initially. Second, the Union can ramp up WS production almost overnight by building Iron Works.
Note: There is a rumour that industry starts producing the turn it appears on the map, even though it still shows as under production. I believe though that there is still a 1 to 3 turn lag between ordering the industry and it actually appearing on the map. Even so, industry seems to have the advantage that it starts producing slightly faster than the transport that is definitely not producing while it is still under construction.
Note 2: Industry production is definitely affected by loyalty and national moral (and I think this is actually reflected in the numbers the structures on the map indicate that they produce). I honestly have no idea if shipping is. I suspect that the loyalty bonus will mostly be slightly bigger than the NM penalty on resource production, which may give industry a slight bonus.
Note 3: Shipping has the advantage that it allocates its production between $ and WS based on which is less plentiful (this is not quite the same thing as which you need more – I would almost always prefer that my shipping produced more $ and less WS). Industry does not have this flexibility.
Note 4: The pricing for the NE England Armories looks like it might be an error, especially since it is identical to the Middle States Iron Works price.
My objective is to build the New England Armories early. I want to increase shipping somewhat – a target of 25$ / turn seems reasonable. I want to build a second set of armories if the loyalty in the target region is high enough to justify it (at least half the target cities over 85% to protect against demonstrations).
ii) Loyalty
I have a few objectives from boosting loyalty. One is to protect against some regional decisions. Loyalty over 50% prevents my opponent from playing partisans or copperheads. Realistically, this is mostly a concern in the Far West where those forces can be a serious threat to gold mines. Elsewhere, it is mostly just annoying. Loyalty over 85% protects against demonstrations too. High loyalty also enhances production, with each 10% increase in loyalty increasing production by 5% (side note – I don't know if this only applies above 50% loyalty or if there is actually a penalty on the base production with loyalty under 50%). Loyalty over 50% also limits my opponent's ability to gain free intel on the region. If the South has a general in the theater that increases detection (and I believe there area few), I believe my opponent can get a detection value of three in these regions, allowing significant intel behind my lines. Finally, loyalty above 50% facilitates guarding cities. It both protects them from raids and also allows me to gain victory points from them without garrisoning regular troops in them.
My objective is to have all of New York, Philadelphia, Washington and Boston with loyalty above 85% and Baltimore with loyalty above 50% by the end of 1861. In addition to a few Habeas Corpus cards, I plan to send Butler (with his hated occupant) to these cities with a few cavalry regiments. Ideally I also want all of the gold mine regions to have loyalty above 85% but I will satisfy myself with a minimum goal of 50%.
Last edited by principes romanes on Sat Dec 17, 2016 5:34 pm, edited 1 time in total.
Currently writing:
The Coming Fury - an excessively detailed AAR on Union strategy
The Coming Fury - an excessively detailed AAR on Union strategy
-
loki100

- AGEod Guard of Honor
- Posts: 2401
- Joined: Sun Aug 14, 2011 4:15 pm
- Location: Caithness
- Contact: Website Twitter
Re: The Coming Fury: A Union AAR by principes romanes
just to say how incredibly helpful this AAR is - still struggling with the opening turns and this provides a framework to use to think over the options and possibillities
-
principes romanes
- Sergeant
- Posts: 89
- Joined: Tue Oct 11, 2016 9:32 pm
- Location: Genève
Re: The Coming Fury: A Union AAR by principes romanes
I'm glad. It is turning out to be more detailed than I intended. I suspect that the detail will drop off soon as I try not to spend so much time writing these posts.
Currently writing:
The Coming Fury - an excessively detailed AAR on Union strategy
The Coming Fury - an excessively detailed AAR on Union strategy
-
principes romanes
- Sergeant
- Posts: 89
- Joined: Tue Oct 11, 2016 9:32 pm
- Location: Genève
7. Opening Moves – Early April 1861
7. Opening Moves – Early April 1861
The union has very few options on the first turn. I will essentially detail all of them.
Build options:
The Union has a few units available early on to build. These forces are unlikely to do much but I don't see a reason not to build the infantry and artillery battery. The Illinois militia may help secure Missouri. The Maryland and New York Militias may be able to help secure Harper's Ferry.
Declare Blockade:
I always do this. I like increasing the blockade % and this is the cheapest way to do so. Also, it is one of the few ways to directly buy NM. If there were an event that I could buy 1NM for $50, I suspect I would use that almost every turn.
Treasury Options
I don't have much that I can do with money at the moment, so raising it does not seem particularly useful. Having excess money sitting around also skews my shipping to producing WS instead of $. The one advantage I see in raising taxes as soon as possible is that the hit to NM has more time to recover from return to normal. Definitely a marginal benefit, but helpful when playing this as a game of inches. My preferred approach is to aim to play the monetary options only when I need them. I would be happy being able to keep one in reserve too, which would allow me slightly greater flexibility to respond. If I can avoid using one tool, I would like to avoid printing money. If I avoid this, I can end up with inflation comfortably in the negatives by late 1862, which can give me a noticeable discount on troops.
I'm curious how many players play all of their financial options off the bat and, if you choose not to use all of them, which do you prefer not to use? (For the record, we are currently in late August, 1861. I will also share any comments on this discussion with my opponent by email).
Regional Decisions (RGD)
I like using these. My strategy though will be to not use them on the first turn to wait and see how my opponent plans to use them. I will then copy his style and strategy to some extent – especially as to whether we aim to target small, out of the way towns with Requisitions and Draft or whether we try to pick the most historically realistic ones (which were often larger).
The union has very few options on the first turn. I will essentially detail all of them.
Build options:
The Union has a few units available early on to build. These forces are unlikely to do much but I don't see a reason not to build the infantry and artillery battery. The Illinois militia may help secure Missouri. The Maryland and New York Militias may be able to help secure Harper's Ferry.
Declare Blockade:
I always do this. I like increasing the blockade % and this is the cheapest way to do so. Also, it is one of the few ways to directly buy NM. If there were an event that I could buy 1NM for $50, I suspect I would use that almost every turn.

Treasury Options
I don't have much that I can do with money at the moment, so raising it does not seem particularly useful. Having excess money sitting around also skews my shipping to producing WS instead of $. The one advantage I see in raising taxes as soon as possible is that the hit to NM has more time to recover from return to normal. Definitely a marginal benefit, but helpful when playing this as a game of inches. My preferred approach is to aim to play the monetary options only when I need them. I would be happy being able to keep one in reserve too, which would allow me slightly greater flexibility to respond. If I can avoid using one tool, I would like to avoid printing money. If I avoid this, I can end up with inflation comfortably in the negatives by late 1862, which can give me a noticeable discount on troops.
I'm curious how many players play all of their financial options off the bat and, if you choose not to use all of them, which do you prefer not to use? (For the record, we are currently in late August, 1861. I will also share any comments on this discussion with my opponent by email).
Regional Decisions (RGD)
I like using these. My strategy though will be to not use them on the first turn to wait and see how my opponent plans to use them. I will then copy his style and strategy to some extent – especially as to whether we aim to target small, out of the way towns with Requisitions and Draft or whether we try to pick the most historically realistic ones (which were often larger).
Currently writing:
The Coming Fury - an excessively detailed AAR on Union strategy
The Coming Fury - an excessively detailed AAR on Union strategy
-
Cardinal Ape

- General of the Army
- Posts: 619
- Joined: Wed Mar 07, 2012 1:59 am
Re: 5. Initial Strategy Considerations – What to Do
principes romanes wrote: It seems though that in a PBEM, most of the distant blockades do not work properly (http://www.ageod-forum.com/viewtopic.php?f=331&t=50889&p=388918#p388918).
While that is true, you should be able to work around it so that it does not adversely affect your game.
The host should run a dummy turn before running the PBEM turn; give the game a warm-up turn to get its sea-legs.
 Any turn in any scenario should do. That should get rid of the hiccups that come with the first turn of a session.
-
principes romanes
- Sergeant
- Posts: 89
- Joined: Tue Oct 11, 2016 9:32 pm
- Location: Genève
Re: 5. Initial Strategy Considerations – What to Do
Cardinal Ape wrote:While that is true, you should be able to work around it so that it does not adversely affect your game.
The host should run a dummy turn before running the PBEM turn; give the game a warm-up turn to get its sea-legs.
Interesting Cardinal Ape. I didn't read Captain Orso's post carefully enough to realise that the problem was with a fresh load of the CW2, not a fresh load of a scenario.
I'll add this clarification to the original thread for others who might not realise this work around.
Currently writing:
The Coming Fury - an excessively detailed AAR on Union strategy
The Coming Fury - an excessively detailed AAR on Union strategy
-
principes romanes
- Sergeant
- Posts: 89
- Joined: Tue Oct 11, 2016 9:32 pm
- Location: Genève
8. Late April 1861
8. Late April 1861
Early April occurred as expected. The Confederates stormed Fort Sumter. It looks like the Union battery did not actually take any losses – Major Anderson appears to have been true to his thoughts of not needlessly wasting lives (I forgot the screenshot of the battle – this is one of the perils of letting my posts lag the game).
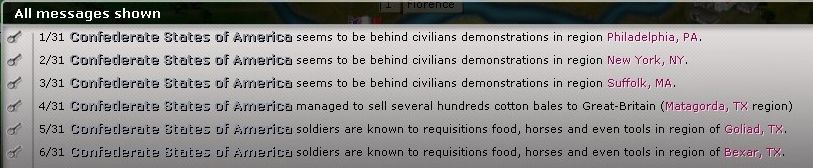
The second thing that happened is that my opponent was very aggressive in playing his revenue options, including both the treasury options and RGDs. He has played his demonstration cards, targeting the big US cities instead of the goldmine regions. I will play my Habeas Corpus cards in response, as well as be aggressive in playing my cards.
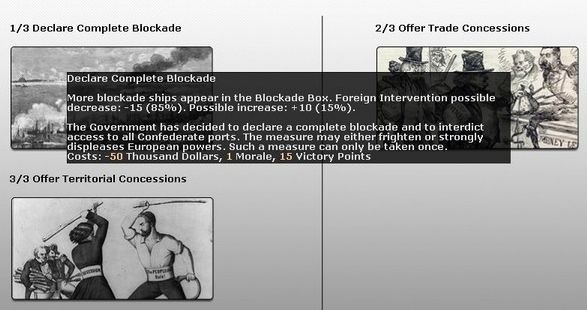
And, unfortunately, FI backfired on the blockade. Compared to the usual result of -15 to FI, this represents a 25 point swing! My instinct is to be very careful spending VPs so that I can gain the VP lead as quickly as possible.
There is very little to do Late April. I have already ordered the builds I want. The only unlocked forces I have are the ships in Norfolk, who are obviously being sent to leave.
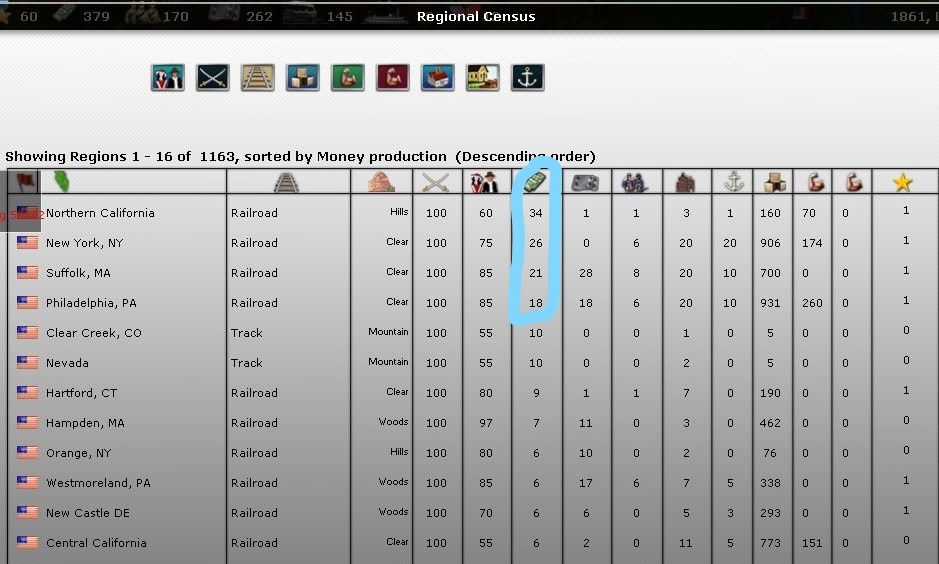
Since I am now playing my RGDs enthusiastically, I want to what the best places to put them are. I generally find that money is my constraining resource, so I probably want to play them in regions where increasing the loyalty can have the greatest increase to my production of money. The regions tab identifies the regions I should be playing my Habeas Corpus in as Northern California, New York, Boston, and Philadelphia. I am also playing the RGDs that produce VPs.
I got Shurtz's cavalry regiment this turn. I could send it to contest Harper's Ferry, but that seems highly aggressive, and most likely a fight I wouldn't win. I will instead send it to Alexandria to go scouting.
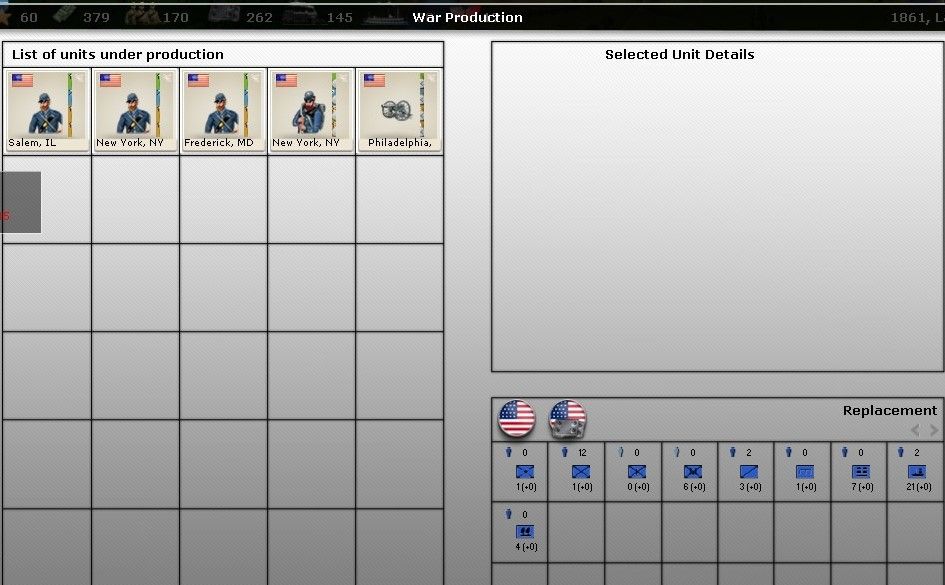
And finally, a shot of the production screen. This is mostly to show those without the replacement bug what it looks like. And it may become a curious historical artifact once the bug is fixed. [Note: I wrote this before the bug was fixed, but I'll just leave it here anyway as that historical artifact I mentioned].
Early April occurred as expected. The Confederates stormed Fort Sumter. It looks like the Union battery did not actually take any losses – Major Anderson appears to have been true to his thoughts of not needlessly wasting lives (I forgot the screenshot of the battle – this is one of the perils of letting my posts lag the game).
The second thing that happened is that my opponent was very aggressive in playing his revenue options, including both the treasury options and RGDs. He has played his demonstration cards, targeting the big US cities instead of the goldmine regions. I will play my Habeas Corpus cards in response, as well as be aggressive in playing my cards.

And, unfortunately, FI backfired on the blockade. Compared to the usual result of -15 to FI, this represents a 25 point swing! My instinct is to be very careful spending VPs so that I can gain the VP lead as quickly as possible.
There is very little to do Late April. I have already ordered the builds I want. The only unlocked forces I have are the ships in Norfolk, who are obviously being sent to leave.
Since I am now playing my RGDs enthusiastically, I want to what the best places to put them are. I generally find that money is my constraining resource, so I probably want to play them in regions where increasing the loyalty can have the greatest increase to my production of money. The regions tab identifies the regions I should be playing my Habeas Corpus in as Northern California, New York, Boston, and Philadelphia. I am also playing the RGDs that produce VPs.

I got Shurtz's cavalry regiment this turn. I could send it to contest Harper's Ferry, but that seems highly aggressive, and most likely a fight I wouldn't win. I will instead send it to Alexandria to go scouting.
And finally, a shot of the production screen. This is mostly to show those without the replacement bug what it looks like. And it may become a curious historical artifact once the bug is fixed. [Note: I wrote this before the bug was fixed, but I'll just leave it here anyway as that historical artifact I mentioned].

Currently writing:
The Coming Fury - an excessively detailed AAR on Union strategy
The Coming Fury - an excessively detailed AAR on Union strategy
-
Cardinal Ape
- General of the Army
- Posts: 619
- Joined: Wed Mar 07, 2012 1:59 am
Re: The Coming Fury: A Union AAR by principes romanes
You asked how other players use their cash options. As the Union I always use them as soon as they are available and I still find myself wanting more cash (who doesn't). I tend to buy a lot of artillery and use the higher end choices of recruiting options. I also tend to invest in my railroad almost every month. But I do not buy a single industrial option, I build every transport for shipping, but no industry.
You mentioned countering the CSA demonstration cards with Habeas Corpus. I can't agree with that, but that's because when it comes to NM costs I am like Ebenezer Scrooge, I can't bring myself to let go of a single point.
Did you know you can try to stop those demonstration decisions with the counter-intel RGD? Failing that, I would rather repair the loyalty damage to important regions with other RGDs that don't cost NM.
Perhaps your opponent did not play any demonstration cards on your gold mines because he is trying to fish out the stock of your counter-intel RGDs first..
Its a nicely detailed AAR you got going.
-
principes romanes
- Sergeant
- Posts: 89
- Joined: Tue Oct 11, 2016 9:32 pm
- Location: Genève
Re: The Coming Fury: A Union AAR by principes romanes
Thanks for the comments Cardinal Ape.
To my surprise, I am currently finding myself short on conscripts. I think it is interesting that different styles of play can be constrained by different resources. I think an infantry heavy army is limited by conscripts, an artillery heavy one largely by money, and a navy largely by war supply. My army choice at the moment seems to be infantry heavy. And I will post my thoughts on artillery builds and what choices I have made in this game at some point. I think it is an interesting topic.
I had been skeptical of the value of counter-intelligence cards for some reason. I think I was leery of spending what felt like a fair bit of money for an uncertain success. I have already written in one of my future posts why I am now persuaded they are actually more worthwhile than I thought. And I agree with you that spending the NM for loyalty is a tough pill to swallow. I think it is the Martial Law, not the Habeas Corpus, that costs NM. I am still tempted to play one in St. Louis. It has the potential to produce so much if only its loyalty were more than 15%... (which also means it is to low to play the Habeas Corpus). Maybe I'll play a few of the Martial Law cards if I manage to avoid the one of the On to Richmond NM loses.
On a more general note, I will be posting updates more slowly over the holidays.
Currently writing:
The Coming Fury - an excessively detailed AAR on Union strategy
The Coming Fury - an excessively detailed AAR on Union strategy
-
Cardinal Ape
- General of the Army
- Posts: 619
- Joined: Wed Mar 07, 2012 1:59 am
Re: The Coming Fury: A Union AAR by principes romanes
You are right to be skeptical of the counter-intelligence cards; their 25$ price tag is pretty high. I rarely use them.
In general I find fighting for loyalty to not be worth the cost. Or rather, I don't like spending resources on loyalty. I try to save every dollar for recruitment. Usually, I just stick to the free ways to increase loyalty, mainly that RGD that increases the entrenchment level, ( the name escapes me at the moment) which also ups loyalty by 10%.
Making use of the generals with the harsh occupier trait (failing at names again, Fremont and Butler have the trait) is a great free way to up loyalty. Fremont should be able to settle down St. Louis, while Butler could be sent to Baltimore for a few turns.
I forgot to ask before: You mentioned shooting for a negative inflation value in mid '62. Have you done this before? Does the game let you have a negative inflation value, and does it decrease the cost of your recruitment?
-
principes romanes
- Sergeant
- Posts: 89
- Joined: Tue Oct 11, 2016 9:32 pm
- Location: Genève
Re: The Coming Fury: A Union AAR by principes romanes
I fully take your points on loyalty, and especially on actually using Fremont and Butler for something useful.
As for the inflation, I have gotten nice negative inflation values in a game against Athena. The cost of a blockade flotilla here is $156 while the standard price is $185. The date is Early October 1863.
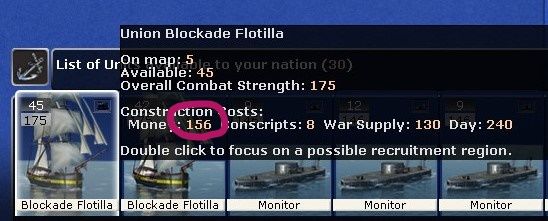
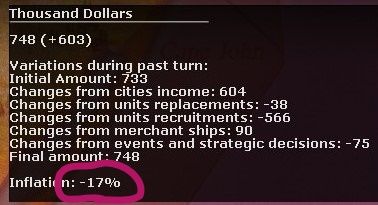
As for the inflation, I have gotten nice negative inflation values in a game against Athena. The cost of a blockade flotilla here is $156 while the standard price is $185. The date is Early October 1863.


Currently writing:
The Coming Fury - an excessively detailed AAR on Union strategy
The Coming Fury - an excessively detailed AAR on Union strategy
-
principes romanes
- Sergeant
- Posts: 89
- Joined: Tue Oct 11, 2016 9:32 pm
- Location: Genève
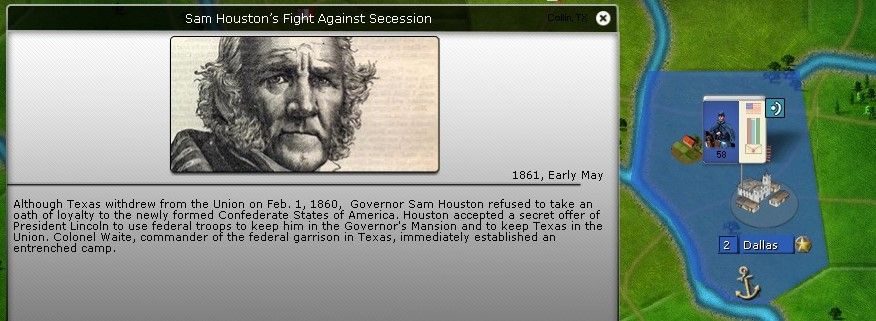
9. Early May 1861
9. Early May 1861
Sam Houston
Sam Houston was familiar with secessionist thinking. He had fought for Texas's independence from Mexico. Texans still remembered the brief period when they were in fact and independent republic. And Washington was a long way away. Yet Washington had the might of the more populous and more industrial North. While Texans might be skilled at fighting in the wilds of their home state, he feared that more bodies would be little more than cannon fodder fighting against the well equipped Federal army. He believed that his primary obligation as Governor was to protect his fellow Texans from suffering senseless deaths. His fellow Texans did not see it this way. Instead, they voted to, yet again, seceded – imagining the glory of epic battlefield charges rather than the agony of injury. Perhaps if he accepted Lincoln's offer to send federal troops to impose martial law...
As you probably guessed, the Sam Houston event happened. I now have two cavalry regiments isolated in Dallas, which is also an objective city (worth 5NM!). I don't think I can hold it against his counter-attack. But, it is a nice objective to own. My thought then is that my cavalry will abandon it, retreating North. They may stop for a bit of pillaging (Sam Houston would not be pleased). I plan to retake Dallas, before the end of the year when its objective status ends, with my first “coastal” raid. I already was thinking of targeting Texas. I can actually make it up some of the Texan rivers fairly easily.
I still have very few units I can move. I am sending Schurtz and his cavalry to cut the Manassas Gap railroad. I am sending the Washington Brigade to occupy Leesburg. I am sending the Illinois militia to secure Jefferson City. In theory I could attempt to challenge the Confederates for Rolla in the hope of securing the depot. I have two reasons for not wanting to do that. The first is that I want to attack with numerical superiority. Moving to where I do not expect to find him achieves that, especially compared to what would otherwise be a battle in Rolla with close to even numbers (depending how close he is to finishing building his militia). Secondly, I am quite happy to let Rolla burn. It allows me to use Jefferson City as my base for attacking Springfield without worrying about him using Rolla to support an attack on St. Louis. And a minor point, but it is harder for Confederate raiders to cut my supply line along the river to Jefferson City than it is to block the rail line through Rolla.
Reinforcements
Early May now provides the Union with some actual recruitment options. My limiting resource is currently conscripts, although I know that once I call volunteers I will be desperate for money.
Here is a summary of how the war is progressing.
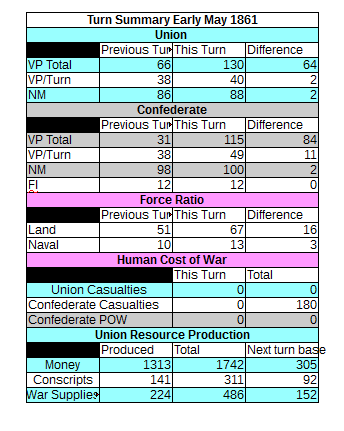
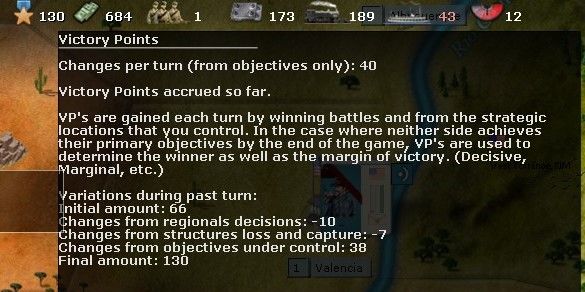
Incidentally, can anyone explain how the VP calculation in a turn actually works? If I take a look at the numbers in this screenshot, they simply do not add up. It looks to me like strategic cities may be providing about twice the VPs they are advertised as providing, but even that doesn't quite add up in this case. And if VP calculation is not WAD, I suspect nobody noticed it because mostly they are not considered very important.
Sam Houston
Sam Houston was familiar with secessionist thinking. He had fought for Texas's independence from Mexico. Texans still remembered the brief period when they were in fact and independent republic. And Washington was a long way away. Yet Washington had the might of the more populous and more industrial North. While Texans might be skilled at fighting in the wilds of their home state, he feared that more bodies would be little more than cannon fodder fighting against the well equipped Federal army. He believed that his primary obligation as Governor was to protect his fellow Texans from suffering senseless deaths. His fellow Texans did not see it this way. Instead, they voted to, yet again, seceded – imagining the glory of epic battlefield charges rather than the agony of injury. Perhaps if he accepted Lincoln's offer to send federal troops to impose martial law...
As you probably guessed, the Sam Houston event happened. I now have two cavalry regiments isolated in Dallas, which is also an objective city (worth 5NM!). I don't think I can hold it against his counter-attack. But, it is a nice objective to own. My thought then is that my cavalry will abandon it, retreating North. They may stop for a bit of pillaging (Sam Houston would not be pleased). I plan to retake Dallas, before the end of the year when its objective status ends, with my first “coastal” raid. I already was thinking of targeting Texas. I can actually make it up some of the Texan rivers fairly easily.

I still have very few units I can move. I am sending Schurtz and his cavalry to cut the Manassas Gap railroad. I am sending the Washington Brigade to occupy Leesburg. I am sending the Illinois militia to secure Jefferson City. In theory I could attempt to challenge the Confederates for Rolla in the hope of securing the depot. I have two reasons for not wanting to do that. The first is that I want to attack with numerical superiority. Moving to where I do not expect to find him achieves that, especially compared to what would otherwise be a battle in Rolla with close to even numbers (depending how close he is to finishing building his militia). Secondly, I am quite happy to let Rolla burn. It allows me to use Jefferson City as my base for attacking Springfield without worrying about him using Rolla to support an attack on St. Louis. And a minor point, but it is harder for Confederate raiders to cut my supply line along the river to Jefferson City than it is to block the rail line through Rolla.
Reinforcements
Early May now provides the Union with some actual recruitment options. My limiting resource is currently conscripts, although I know that once I call volunteers I will be desperate for money.
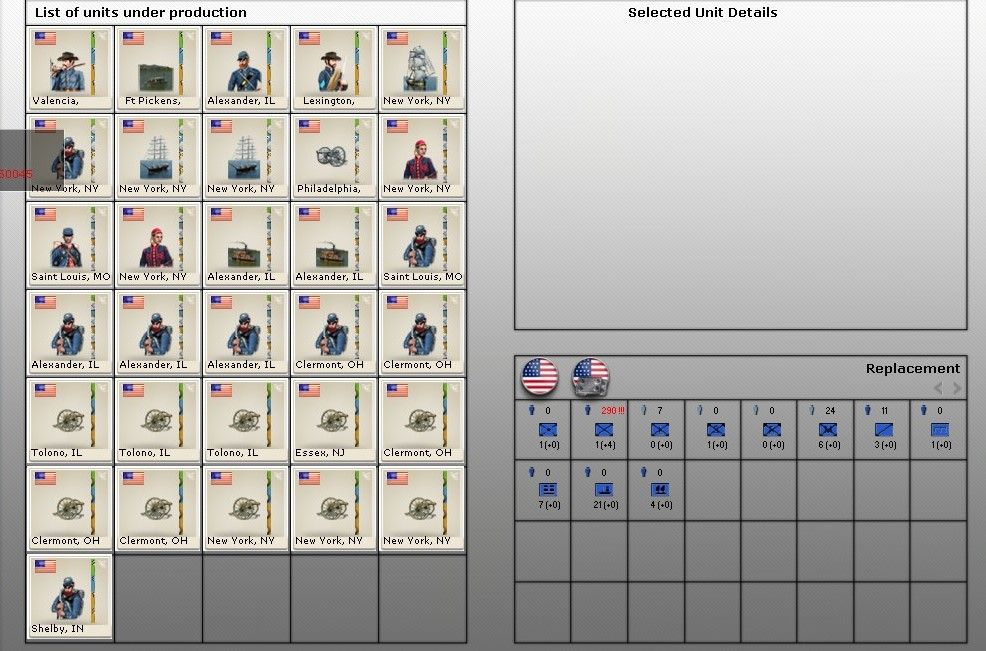
- Ranger in Far West – to start the campaign of burning
- Flatboat in Ft. Pickens – to build a depot so that I am unlikely to surrender in a siege
- Volunteer in Lexington, MO – to start garrisoning MO, as it is a tempting raiding target
- Blockade Flotilla in NY – freebie, not actually a build. I set this to passive to recover missing elements
- Infantry Brigades in NY (1 x 2INF + 2 x 2INF+1CAV+6lb) – The first one you see is French's Brigade from the first turn. The other two are small combined brigades (with cannon) for garrison duty in coastal forts or for retaking Dallas.
- Transports (2) – these are for the shipping box
- 10lb Artillery in Philadelphia – this is one of the first turn builds
- Infantry brigade in St. Louis (2 x 2INF + CAV) – these are to join Lyons' force
- Infantry brigade in Cairo (3 x 2INF) – Cairo is vulnerable early. I also want a force to contest Paducah when Kentucky secedes. As my opponent should be able to see Cairo (for some reason, Charleston, MO is the one town in MO with 100% Confederate loyalty), a large force here may encourage him to garrison Island 10 and Forts Henry and Donelson instead of aggressively pushing for Paducah. Also good to note, the Illinois 2 regiment brigades are one of the ones that build with both units being regulars (no conscripts).
- Timberclads in Cairo (x2) – I can likely get a heads up if Confederate ports start building ships, but the Confederacy risks having faster construction times, so I do need some sort of a head start to maintain my river superiority. I am also loath to rely on the gunboats for combat (they work fine blocking river crossings).
- Infantry in Clermont, OH (2x 2INF + CAV) – These units are with McClellan for him to train (although I have subsequently realized he has not trained these conscript regiments, either because he is fixed or they are still under construction).
- 12lb artillery in various cities (total of 10) – I have bought all the East Coast 12lb batteries I can. This artillery is going to go to bolstering my defensive front lines. I might discuss choices of artillery purchases in another turn.
- Sharpshooter Brigade in Shelby, IN (SS + 1 or 2 INF) – I think I have a habit of under-puchasing sharpshooters, which means I am often looking at adding them to divisions later in the game. I will see how well I mange them this game.

Here is a summary of how the war is progressing.

Incidentally, can anyone explain how the VP calculation in a turn actually works? If I take a look at the numbers in this screenshot, they simply do not add up. It looks to me like strategic cities may be providing about twice the VPs they are advertised as providing, but even that doesn't quite add up in this case. And if VP calculation is not WAD, I suspect nobody noticed it because mostly they are not considered very important.

Currently writing:
The Coming Fury - an excessively detailed AAR on Union strategy
The Coming Fury - an excessively detailed AAR on Union strategy
-
principes romanes
- Sergeant
- Posts: 89
- Joined: Tue Oct 11, 2016 9:32 pm
- Location: Genève
9a. VP tallies
9a. VP tallies
Having tracked VP accumulation for a few more turns, I have a slightly better sense of what it might be doing. It is clear to me though that there are some VPs that are being awarded that are not showing up when I scroll over the VP count. Some turns the stated amount of the VP increase seems perfectly accurate, other times it is an under-estimate (often by a lot). I have two guesses for what the extra VPs might be. They might be the result of unit construction. They may also be a bug of some sort that is essentially double counting the VPs from objectives.
The screen-shot below illustrates many of the ways a player can earn VPs. They are:
I have no idea what the change from "structures productions" VPs are. Any ideas? Unadvertised costs from building industry?
Finally, I note that if add up all the VPs I earned (and lost -oops) this turn, I should have gained 31 VPs. Instead I gained 72! The unaccounted for 41 VPs is suspiciously similar to the 42VPs earned from objectives. If I add up the number after the slash on the VPs under the Various tab for all the units completed this turn, I get 47. I think it is more likely that the discrepancy relates to holding objectives than it does to completing units.
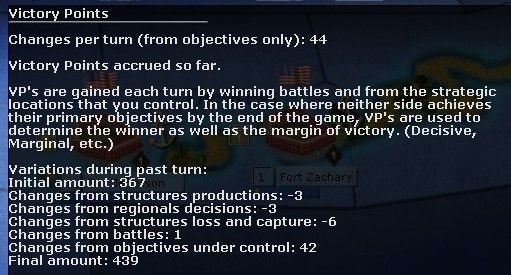
Also, sorry for the spoiler that, at some unspecified future date, I still hold both Forts Jefferson and Zachary in the Florida Keys.
Having tracked VP accumulation for a few more turns, I have a slightly better sense of what it might be doing. It is clear to me though that there are some VPs that are being awarded that are not showing up when I scroll over the VP count. Some turns the stated amount of the VP increase seems perfectly accurate, other times it is an under-estimate (often by a lot). I have two guesses for what the extra VPs might be. They might be the result of unit construction. They may also be a bug of some sort that is essentially double counting the VPs from objectives.
The screen-shot below illustrates many of the ways a player can earn VPs. They are:
- the objectives under control,
- winning battles (and sieges),
- RGDs,
- capturing structures.
I have no idea what the change from "structures productions" VPs are. Any ideas? Unadvertised costs from building industry?
Finally, I note that if add up all the VPs I earned (and lost -oops) this turn, I should have gained 31 VPs. Instead I gained 72! The unaccounted for 41 VPs is suspiciously similar to the 42VPs earned from objectives. If I add up the number after the slash on the VPs under the Various tab for all the units completed this turn, I get 47. I think it is more likely that the discrepancy relates to holding objectives than it does to completing units.

Also, sorry for the spoiler that, at some unspecified future date, I still hold both Forts Jefferson and Zachary in the Florida Keys.
Currently writing:
The Coming Fury - an excessively detailed AAR on Union strategy
The Coming Fury - an excessively detailed AAR on Union strategy
-
principes romanes
- Sergeant
- Posts: 89
- Joined: Tue Oct 11, 2016 9:32 pm
- Location: Genève
10. Late May 1861
10. Late May 1861
Once things become more interesting, I may start breaking the turn into a results and an orders phase. For now though, the results are not particularly interesting. The most interesting intel I gathered is that my opponent is building depots in Northern Tennessee on the Kentucky boarder. That rules out any consideration I had of launching an amphibious assault there.
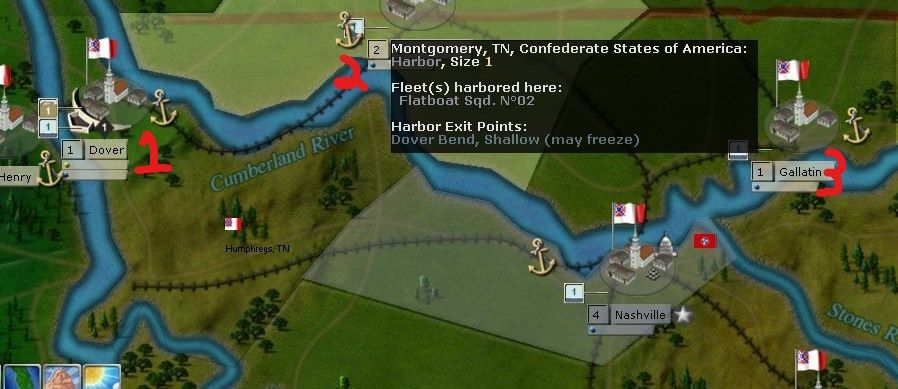
Resources
I have been fairly conservative until now on generating revenue, for the reasons I've previously explained. I believe that my opponent has now used every revenue tool available to him – both Treasury and RGD options. I am concerned that he intends to be very aggressive early on. I should prepare to counter that. Secondly, I think I have been overly concerned about FI. If it happens, it happens. The way to prevent it though is to capture territory and win battles to regain the VP lead, which needs resources. And building a strong army (and navy) is my best insurance in case FI happens.
East
Other than continuing to build, I am attempting to cut the Manassas Gap rail line in Clark, VA to make it a bit harder for the Confederates to shift between Manassas and the Valley. I have captured Leesburg. The challenge on this front will be trying to defend a line that is three regions long before I have corps that can offer mutual support.
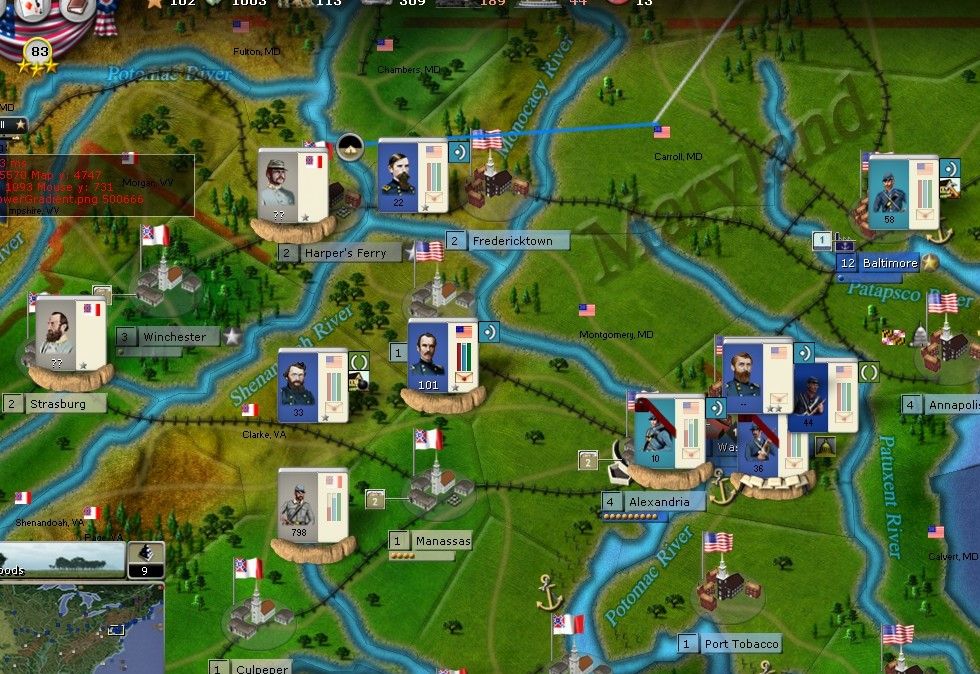
Elsewhere
Not much to do. I ordered the Texas cavalry to stop to burn Preston Bend on their way North. I have ordered my river fleet to concentrate in Cairo. And I ordered the West Virginia Reaction force to burn the depot in Morgantown, hopefully making the Confederate supply problems worse if I lose it.
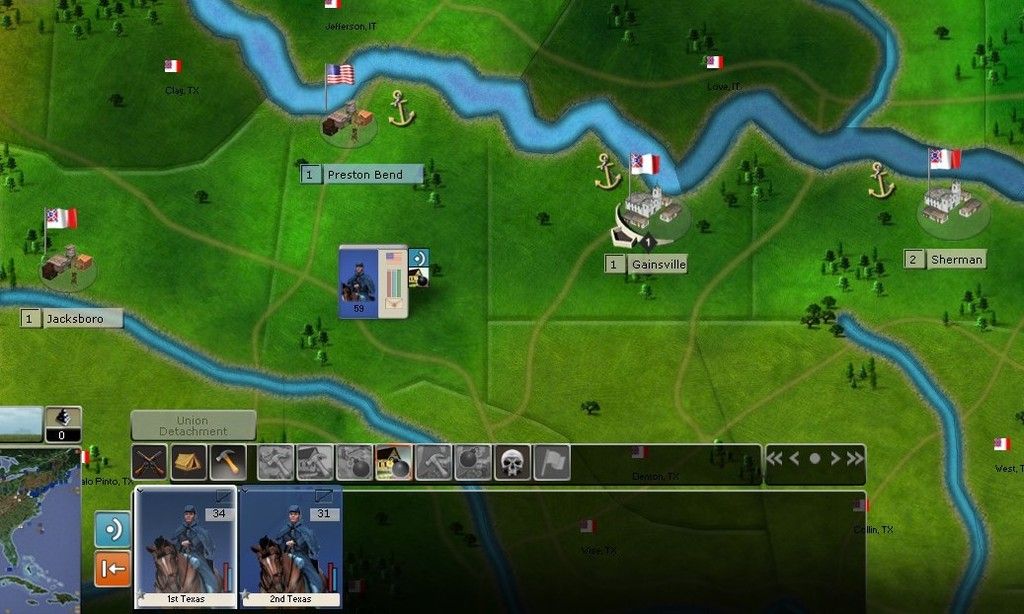
Overall, the situation is similar to last turn. I managed to gain an early VP lead that I think is due largely to my opponent playing his full revenue options and playing a few RGDs that cost VPs (mostly I think the Draft card). I expect that I will lose the lead this turn though.
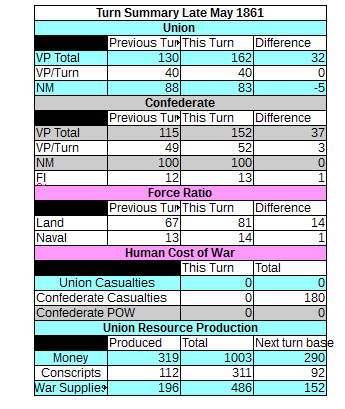
Question: Does anybody know what the state capitols actually do? There is a tool tip that indicates that they produce additional NM overtime. This seems – implausible – to me. It may be though that they generate VPs, in particular as the VP totals do not seem to add up very well. NB: The “capitole” symbol is the little white dome between the flag and the steeple.
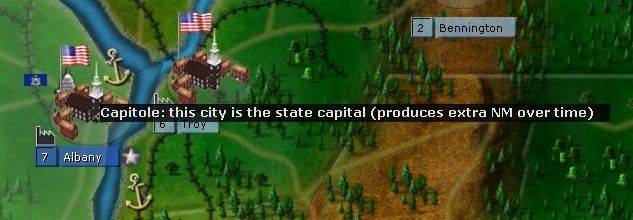
And finally, a (visual) update on my recruiting. I did more infantry recruiting in the East this turn. And my opponent appears to have the replacement bug too (again, now patched).
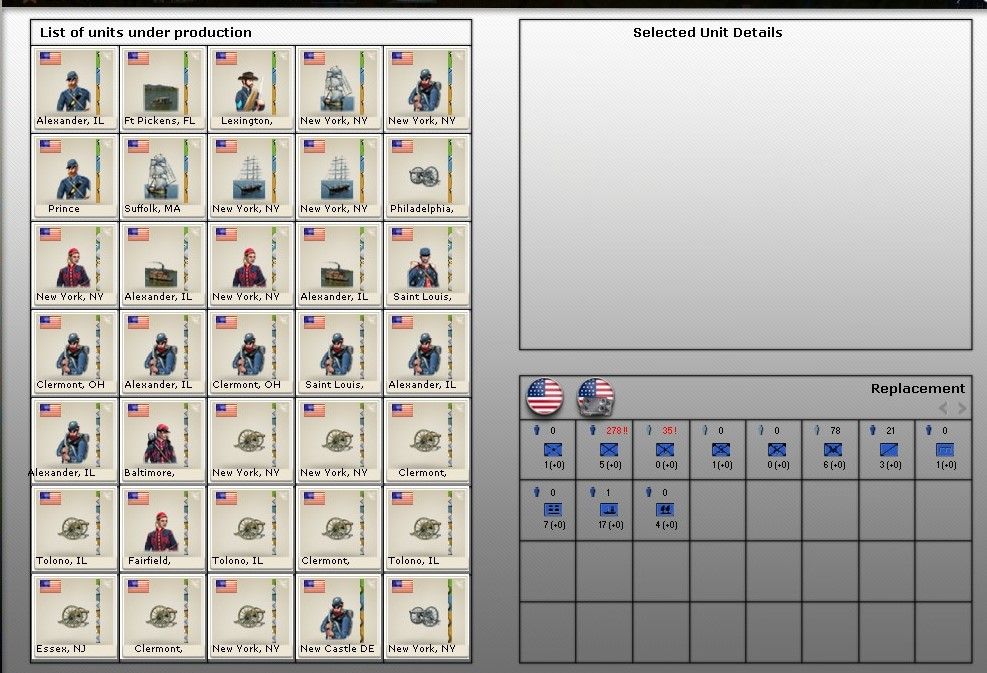

Currently writing:
The Coming Fury - an excessively detailed AAR on Union strategy
The Coming Fury - an excessively detailed AAR on Union strategy
-
principes romanes
- Sergeant
- Posts: 89
- Joined: Tue Oct 11, 2016 9:32 pm
- Location: Genève
11. Early June 1861
11. Early June 1861
There is a rumour that a unit can only recover one missing element in a turn. It appears that is not true, as the message log states that the same blockade flotilla recovered two elements.
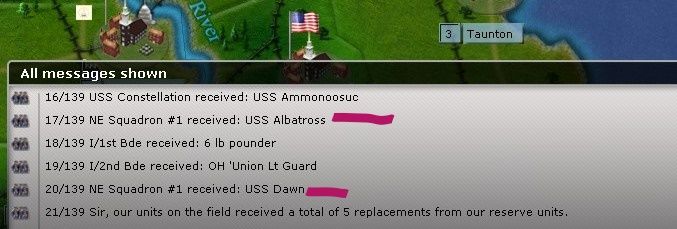
His cavalry caught up with me in Preston Bend, resulting in the first land battle of the war. Hopefully that does not slow down my escape. Fort Monroe bombarded the 1st Reserve Bde as it joined Evans in Hampton Roads. Evans also has a battery of Heavy Guns, so I suspect my opponent may be hoping to attack Fort Monroe.
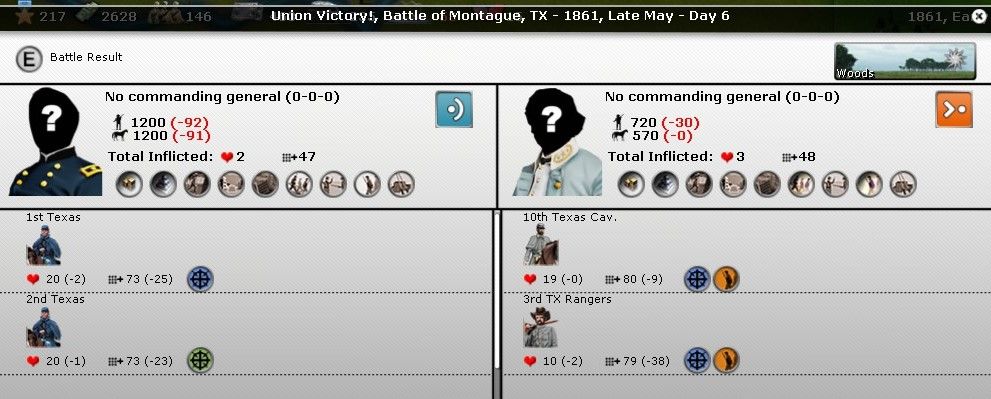
Summary
The only notable thing is that my NM appears to have gone up in response to calling for taxation.
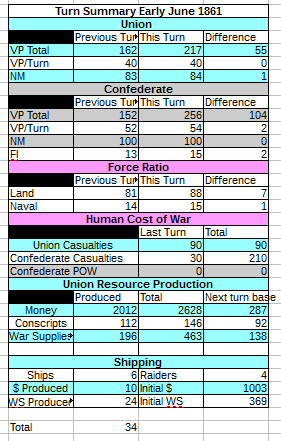
East
Essentially I have tried to establish a defensive line three regions long. I'm aiming for Alexandria, Loundon and Harper's Ferry. Alexandria will need some reinforcements but I should be able to hold, even outnumbered. It is only receiving one reinforcement brigade. Loundon is much weaker than his forces at the moment. It is receiving Stone's command plus a few more brigades from the rear, which will hopefully give it a power of around 300. Not enough for a definitive defence but hopefully a strong deterrent. It will also be crucially short on artillery for the first few turns. Reserves are also going to Fredricktown, hopefully also bringing that force up to around 300. The key to the plan however is that Patterson's isolated and understrength Army of the Valley [NB – not actually an army command] will attempt to take Harper's Ferry. If it succeeds, it will be easy for Wallace's force from Fredricktown to join them and allow me to consolidate my forces. If not, Patterson’s command risks being isolated and certainly will not be between the enemy armies and Washington. Finally, I have a militia element that will soon start construction on the stockades.
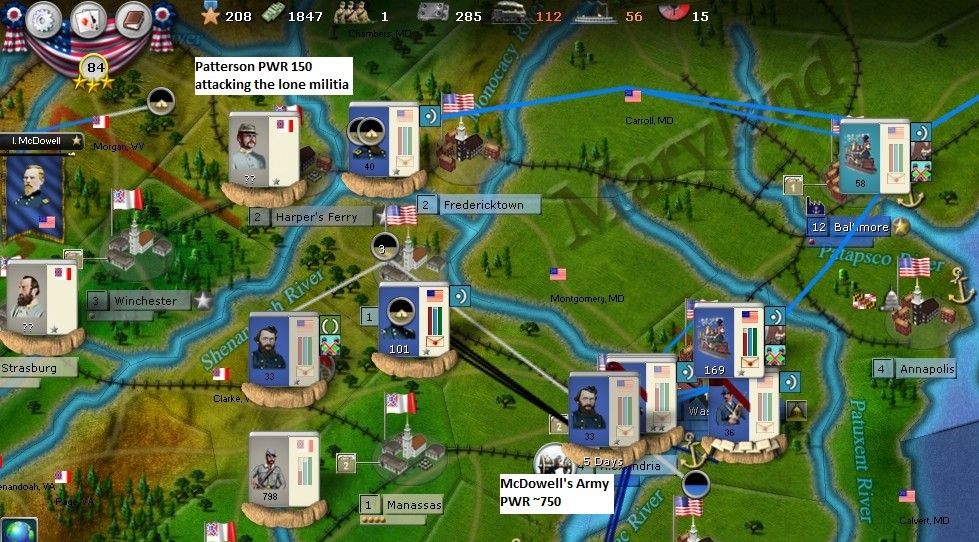
In West Virginia, I am remaining in Morgantown while I await reinforcements that are consolidating in Wheeling.
West
The weather in Missouri is uncooperative – it's muddy. Nonetheless, I am sending Lyon to Rolla to secure the city, except for two cavalry elements. I am sending one to Jefferson City to be used for scouting. I am sending the other down to Cairo to scout whether a force is building at New Madrid.
The Texas cavalry will continue their retreat to friendly lines. Meanwhile, some rangers are starting a slash a burn campaign at Fort Stanton. The forces on the Pacific coast are starting to consolidate, although much of that movement is awaiting a transport from the Atlantic.
Industrialization
I decided to industrialize. My decision making though was based on flawed analysis that I presented above. Actually, it was even worse because I thought armories produced 2$ and 1 WS. So, I built some armories but I'm not sure that was wiser than investing in shipping or Iron Works. But even so, I think I chose the best armory option available.
Not all of the armory options are equivalent. It turns out that building in New England actually provides one more armory for a slightly cheaper total price. Furthermore, all the cities they build in, except the one that builds in Boston, have 99% loyalty, meaning they already benefit from a large loyalty production bonus.

Reinforcements
This turn I did almost all of my building on the East Coast. In particular though, I have started building Butler's cavalry loyalty force. I also built the first army HQ in NY. I have a lot of troops training there that can benefit from it. In particular, I would like to increase the experience for the cavalry that Butler will be using. Police values start so low that a single experience level, earned after just 5 turns in an HQ stack, will increase a cavalry element's police value by 50% (from 2 to 3).
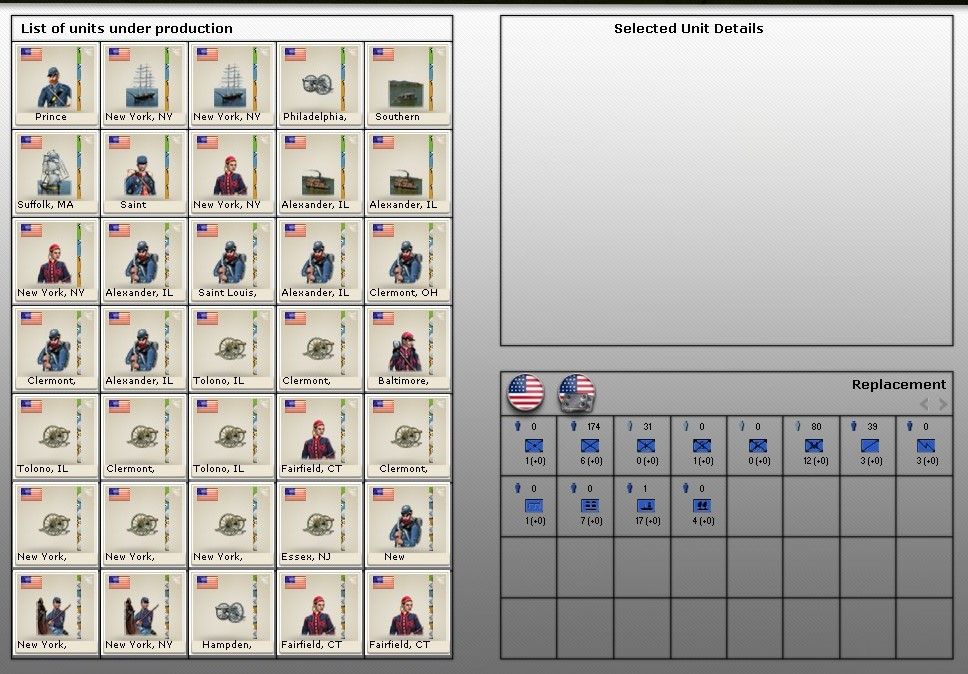

Currently writing:
The Coming Fury - an excessively detailed AAR on Union strategy
The Coming Fury - an excessively detailed AAR on Union strategy
-
principes romanes
- Sergeant
- Posts: 89
- Joined: Tue Oct 11, 2016 9:32 pm
- Location: Genève
12. Late June 1861
12. Late June 1861
This turn represents a bit of a gap in real life, so I am picking up the game thread again. The exciting news though is that we have now gotten to the point in the game where the replacement bug was addressed! I suspect the couple of turns of free replacements we both had early on won't affect the overall game very much. It just means we both have about an extra brigade or two.
East
The Union has won its first clear battlefield victory! Early on Thursday, June 13th, 1861 Major General Robert Patterson's Army of the Valley approached Harper's Ferry from the West. After spending most of the morning deploying his forces, the Army advanced on the defending militia element shortly after noon. After exchanging several rounds of fire, Major General Patterson ordered a retreat to reform his ranks. During this lull, the remaining defenders attempted to withdraw from the field. Brig. General Charles Hamilton ordered the Philadelphia cavalry in his 6th brigade to pursue and scatter the withdrawing enemy, entirely destroying it as an effective fighting force.

This means that I now hold Alexandria, Leesburg and Harper's Ferry. This is the line I hope to hold. I currently have adequate forces with McDowell in Alexandria but both of the other two positions are weak. I am sending the force in Fredricktown to reinforce Patterson in Harper's Ferry. That will give me a PWR of about 450. In the short term, the mud will also give me a defensive advantage. Meanwhile, Shields' force outside Leesburg has a PWR of 370. That force looks vulnerable compared to Beauregard's PWR of 1200. Furthermore, both Patterson and Shields are very short on artillery. Fortunately more is being built.
An attack at either Harper's Ferry or Leesburg seems credible. If I am attacked at Harper's Ferry, I will hope that my reinforcements from Fredricktown are enough and arrive in time. As for Leesburg, I could potentially shift some troops from Alexandria for one turn and plan to send them back next turn. My concern with this is that it makes Alexandria look vulnerable next turn. This may be to my advantage though if it induces Beauregard to attack – it would set me up to consolidate my forces for a battle the same way Beauregard and Johnston historically did at Bull Run. As such, I am sending the 1st and 2nd brigades of the II Division (PWR 138) to Shields.
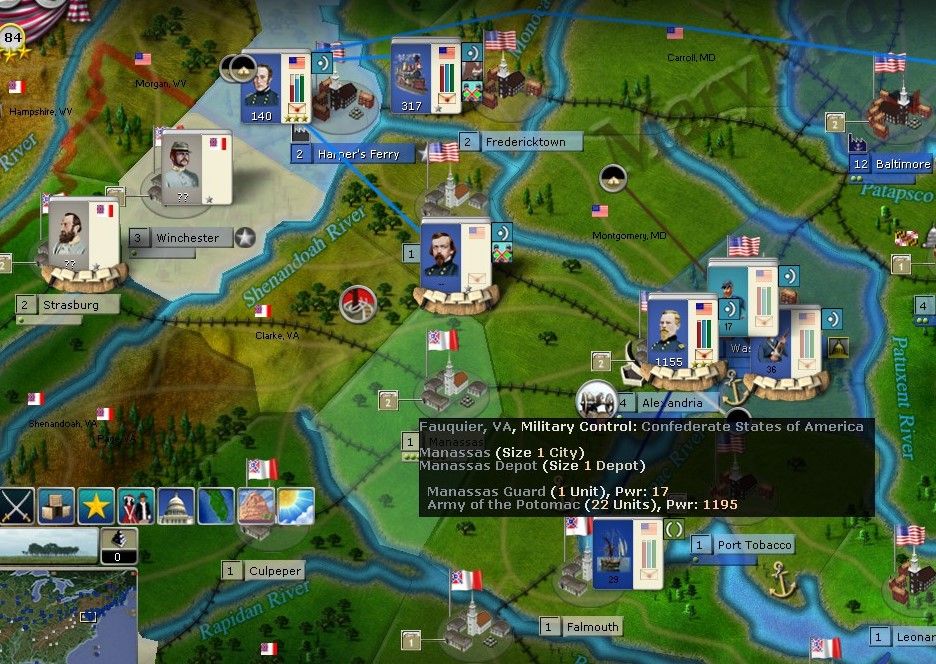
The greater concern in this theater though is Fort Monroe. Evans force has moved into position to besiege Butler and my force was defending in the fort. Magruder's force is coming in to reinforce him (by river transport – a mistake that I suspect may expose him to artillery fire). I don't think that he has enough force to conduct an effective siege. Once his besieging artillery digs in though, it will mean I cannot safety bring ships into the harbour – thus disrupting my plan to transfer Butler to use his hated occupant trait.
In short, I should have defended outside the fort. I have two options now: 1) Reinforce and stay in the fort. I do not think the fort is actually at serious threat from assault or surrendering (I have both a depot and supply waggon). 2) Move outside the fort and hope to win a battle, especially before Magruder arrives and his combined force outnumbers me.
The first option essentially postpones the risk of a defeat. The second option provides an opportunity for a victory. I suspect it may be the wiser course of action. In the end, I accidentally moved the force outside and in so doing lost the entrenchments in the fort. At that point I figured I might as well just go for the fight. Maybe General Butler misunderstood his orders.
West
In Missouri, the Confederate militia in Rolla have destroyed the town. I was planning on using Jefferson City as my base to attack Springfield anyway, so that actually helps protect my flank.
Some small enemy forces are looking to take some of the stockades and small towns in Kansas. This does not particularly concern me – I was planning on destroying many of these anyway. If it occupies forces that would otherwise be defending Springfield, so much the better.
Reinforcements
Conscripts are by far my most limiting resource at the moment (although I expect this will change soon). As such, I was willing to trade the 15 VP for an extra 45 conscript companies through the draft card.
I actually purchased replacements this turn! That, along with the lack of conscripts, left little for new builds. The two builds I made were infantry brigades in the East. I will need to both reinforce my main armies and I want a small force I can send to recapture Dallas before the end of the year.
Note that my opponent has also decided to industrialize, building Iron Works in both the coastal cities and in Tennessee and Georgia.
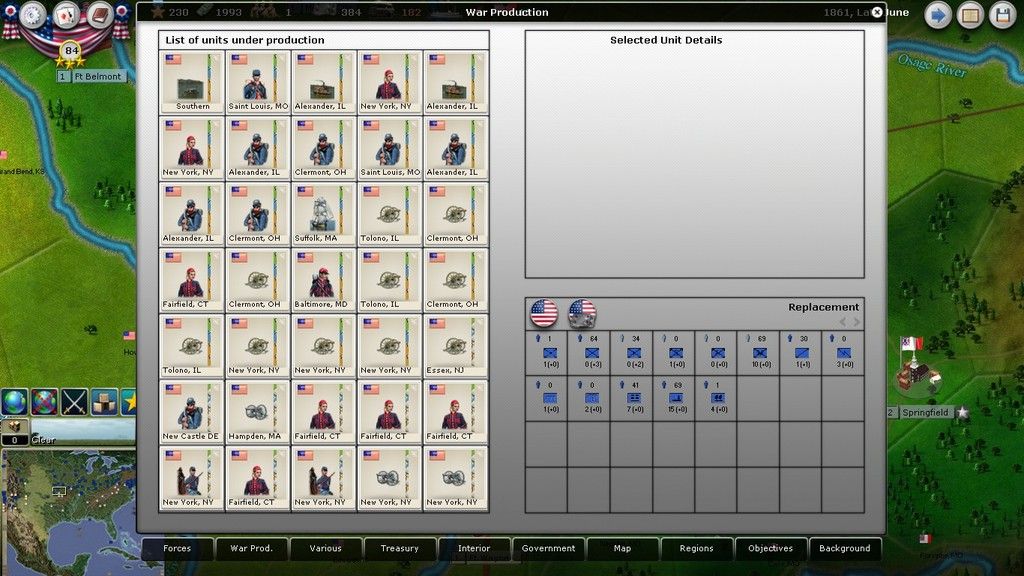
Overview
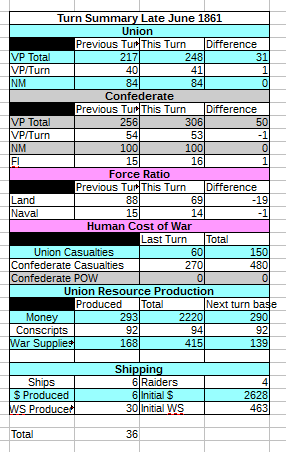
This turn represents a bit of a gap in real life, so I am picking up the game thread again. The exciting news though is that we have now gotten to the point in the game where the replacement bug was addressed! I suspect the couple of turns of free replacements we both had early on won't affect the overall game very much. It just means we both have about an extra brigade or two.
East
The Union has won its first clear battlefield victory! Early on Thursday, June 13th, 1861 Major General Robert Patterson's Army of the Valley approached Harper's Ferry from the West. After spending most of the morning deploying his forces, the Army advanced on the defending militia element shortly after noon. After exchanging several rounds of fire, Major General Patterson ordered a retreat to reform his ranks. During this lull, the remaining defenders attempted to withdraw from the field. Brig. General Charles Hamilton ordered the Philadelphia cavalry in his 6th brigade to pursue and scatter the withdrawing enemy, entirely destroying it as an effective fighting force.

This means that I now hold Alexandria, Leesburg and Harper's Ferry. This is the line I hope to hold. I currently have adequate forces with McDowell in Alexandria but both of the other two positions are weak. I am sending the force in Fredricktown to reinforce Patterson in Harper's Ferry. That will give me a PWR of about 450. In the short term, the mud will also give me a defensive advantage. Meanwhile, Shields' force outside Leesburg has a PWR of 370. That force looks vulnerable compared to Beauregard's PWR of 1200. Furthermore, both Patterson and Shields are very short on artillery. Fortunately more is being built.
An attack at either Harper's Ferry or Leesburg seems credible. If I am attacked at Harper's Ferry, I will hope that my reinforcements from Fredricktown are enough and arrive in time. As for Leesburg, I could potentially shift some troops from Alexandria for one turn and plan to send them back next turn. My concern with this is that it makes Alexandria look vulnerable next turn. This may be to my advantage though if it induces Beauregard to attack – it would set me up to consolidate my forces for a battle the same way Beauregard and Johnston historically did at Bull Run. As such, I am sending the 1st and 2nd brigades of the II Division (PWR 138) to Shields.

The greater concern in this theater though is Fort Monroe. Evans force has moved into position to besiege Butler and my force was defending in the fort. Magruder's force is coming in to reinforce him (by river transport – a mistake that I suspect may expose him to artillery fire). I don't think that he has enough force to conduct an effective siege. Once his besieging artillery digs in though, it will mean I cannot safety bring ships into the harbour – thus disrupting my plan to transfer Butler to use his hated occupant trait.
In short, I should have defended outside the fort. I have two options now: 1) Reinforce and stay in the fort. I do not think the fort is actually at serious threat from assault or surrendering (I have both a depot and supply waggon). 2) Move outside the fort and hope to win a battle, especially before Magruder arrives and his combined force outnumbers me.
The first option essentially postpones the risk of a defeat. The second option provides an opportunity for a victory. I suspect it may be the wiser course of action. In the end, I accidentally moved the force outside and in so doing lost the entrenchments in the fort. At that point I figured I might as well just go for the fight. Maybe General Butler misunderstood his orders.

West
In Missouri, the Confederate militia in Rolla have destroyed the town. I was planning on using Jefferson City as my base to attack Springfield anyway, so that actually helps protect my flank.
Some small enemy forces are looking to take some of the stockades and small towns in Kansas. This does not particularly concern me – I was planning on destroying many of these anyway. If it occupies forces that would otherwise be defending Springfield, so much the better.
Reinforcements
Conscripts are by far my most limiting resource at the moment (although I expect this will change soon). As such, I was willing to trade the 15 VP for an extra 45 conscript companies through the draft card.
I actually purchased replacements this turn! That, along with the lack of conscripts, left little for new builds. The two builds I made were infantry brigades in the East. I will need to both reinforce my main armies and I want a small force I can send to recapture Dallas before the end of the year.
Note that my opponent has also decided to industrialize, building Iron Works in both the coastal cities and in Tennessee and Georgia.

Overview

Currently writing:
The Coming Fury - an excessively detailed AAR on Union strategy
The Coming Fury - an excessively detailed AAR on Union strategy

Re: The Coming Fury: A Union AAR by principes romanes
"Does anybody know what the state capitols actually do?"
I asked this in the forum a while back after having seen the same message. This message is for other AGEOD games, so the state Capitals have no additional NM effect from this in CW2.
FYI, a full blockade naval force in Hampton Roads sea region will partially isolate Fort Monroe from any Confederate force coming overland. It would provide, IIRC, a 92% chance to prevent any crossing of the waterway to the fort. Also, the ships' guns would provide support in a battle. It's not apparent that Monroe is an island. If you click on the garrison and then depress the "Shift" key, you will see a group of lines extending from the unit on the map. The dark blue line means that the James Estuary is a major water obstacle and the light blue line indicates a river/waterway must be crossed to get to/from James City, VA. If this were a brown line, then the route would be across land.
You don't seem to know anything about the size of Evans force laying siege. It's never a good practice to attack an unknown force with no preparation, so good luck with that!
-
Straight Arrow

- General
- Posts: 507
- Joined: Fri Nov 07, 2014 5:44 pm
- Location: Washington State
Re: The Coming Fury: A Union AAR by principes romanes
principe’s romanes, this is a most excellent action report.
Its quality and quantity is very impressive; you are putting in a tremendous amount of work.
Who knew about negative inflation?
Keep up the good fight; I think we’re all looking forward to the next installment
Edit, By the way, how did you include tables in your report?
Its quality and quantity is very impressive; you are putting in a tremendous amount of work.
Who knew about negative inflation?
Keep up the good fight; I think we’re all looking forward to the next installment
Edit, By the way, how did you include tables in your report?
-
Cardinal Ape
- General of the Army
- Posts: 619
- Joined: Wed Mar 07, 2012 1:59 am
Re: The Coming Fury: A Union AAR by principes romanes
D'oh, you accidentally lost the level 8 entrenchment in Fort Monroe? That's not good... Well, if worst comes to worst then you won't have to worry about Butler demanding an army command...
Perhaps you can turn the Fort into Alcatraz if it falls; trap those assaulters on that island for the rest of game.
@SA, It looks like he took pictures of his office program tables and posted them as images.
Perhaps you can turn the Fort into Alcatraz if it falls; trap those assaulters on that island for the rest of game.
@SA, It looks like he took pictures of his office program tables and posted them as images.
-
principes romanes
- Sergeant
- Posts: 89
- Joined: Tue Oct 11, 2016 9:32 pm
- Location: Genève
Re: The Coming Fury: A Union AAR by principes romanes
Thanks for the replies
Yup, took screenshots of my spreadsheet for the tables.
I sort of figured that the state capitols didn't have any independent effect, although I would bet that most of them are strategic cities with a VP or two.
I'm not as consistent in using the "shift" key to check where rivers are as I maybe should be. I hadn't realised that there is a "river" crossing at Fort Monroe there. The movement regions going out of Hampton Roads (James City, VA) are a bit tricky to follow too...
RE Evans Force: I think I knew which units were in it, so I could guess it's size. The bigger unknown was Magruder's force coming down the James...
I'm moving slowly on the AAR, but it is still happening. I've got everything written up to where we are in the game; it's including the pictures that seems to be my big time drag.
Currently writing:
The Coming Fury - an excessively detailed AAR on Union strategy
The Coming Fury - an excessively detailed AAR on Union strategy
-
principes romanes
- Sergeant
- Posts: 89
- Joined: Tue Oct 11, 2016 9:32 pm
- Location: Genève
13. Early July 1861
13. Early July 1861
Congress has authorized a call for volunteers!
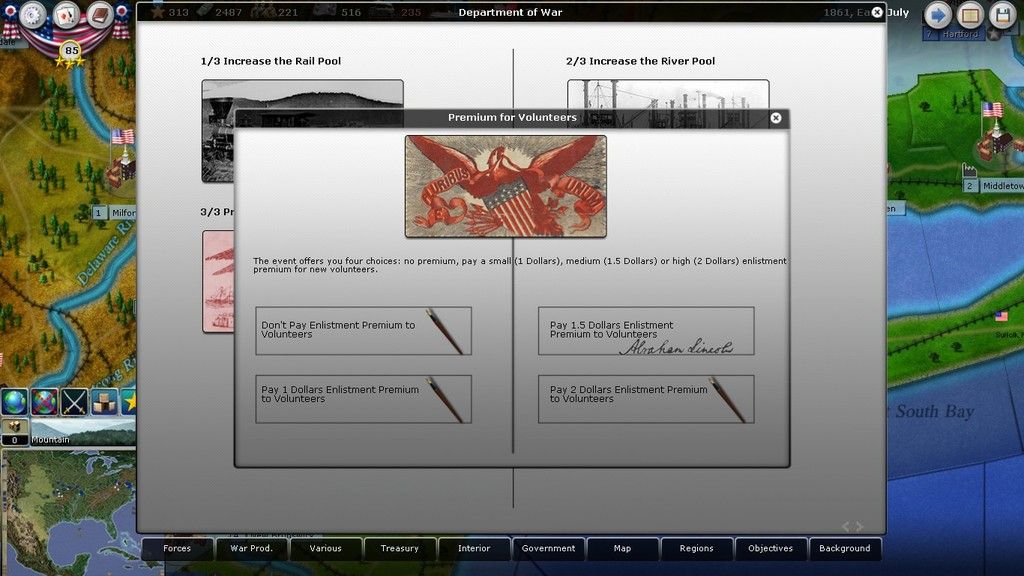
The most important question this turn is what premium I should offer for volunteers. I do not know the exact effect of each option. I am usually fairly constrained for conscripts, but it is also easy for the Union to lack money. My rough balancing of that is that I want to pay a $1.5 premium for volunteers.
Butler made a brief sortie from Fort Monroe. While he had a convincing victory over Evans, he promptly turned tail and fled at the 100,000 reinforcements Magruder was bringing down the peninsula. As such, I am back to being besieged in Fort Monroe, although now without the benefit of trenches.
I note that my two commanding officers with field victories to their name are Butler and Patterson.

Northern Virginia
In Northern Virginia, Jackson has moved up to defend Winchester and Longstreet has moved into Manassas Gap. I find stationing a significant force in Manasas Gap to be an interesting choice – it strikes me that the South can benefit from concentrating their forces in only Winchester and Manassas since a large Union force in Manassas gap would be badly out of position to block routes to Washington.
I would very much like some cavalry to improve my intelligence reports, but the information I have suggests that in both cases my force is larger. Furthermore, I have a few brigades that should be finished training later in the month that can reinforce these positions shorty.
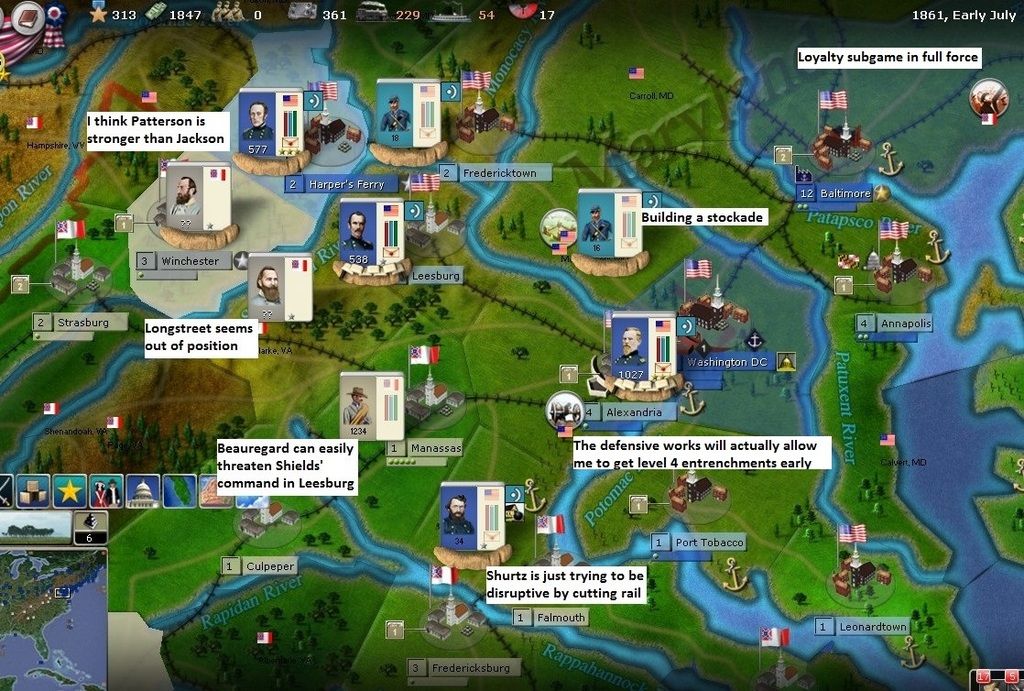
West
Not much happened here. I have mostly consolidated my fleet. Until I have a few ironclads to form the backbone of my main fleet, I am leery of splinting up the river fleet in case it is defeated in detail by the concentrated Confederate fleet. I will send it down the Mississippi for a bit of scouting to see if New Madrid or Island 10 is weak. I will likely break a few gunboats off to have a look at Forts Henry and Donelson. I figure that so long as my opponent knows I can see the state of his defences it means he cannot afford to leave them weak.
My scouting of Springfield reveals that it is undefended. I will attempt to sneak my cavalry in before the Rolla militia make it there. Lyon will also race for Springfield rather than allow his troops to recover from their marching.
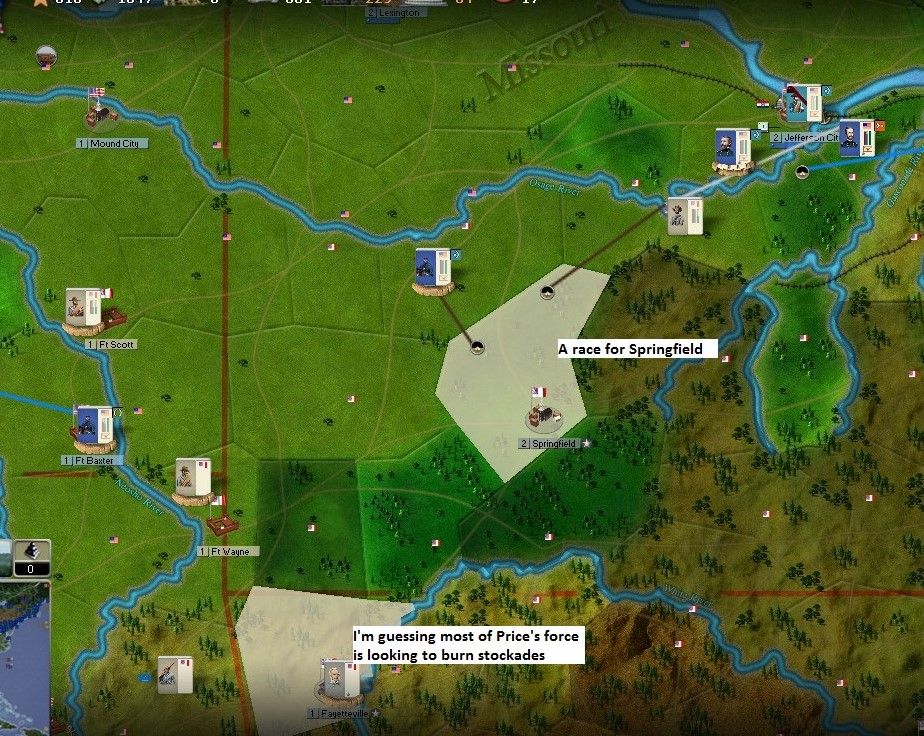
In the far West, ranger units are attempting to destroy the Texas chain of stockades to prevent Sibley from launching any serious attacks.
Reinforcements
Builds have mostly been infantry, and that largely on the East Coast. I had some desperate artillery builds in the West, as I realized my Cairo force does not have a single piece of field artillery. Lyon's force is not much better – he has one battery. I am also building another timberclad in Cairo. I can see some Southern ironclads under construction already. I cannot yet build any of my own to counter them, so I will need to rely on timberclads in the short term.
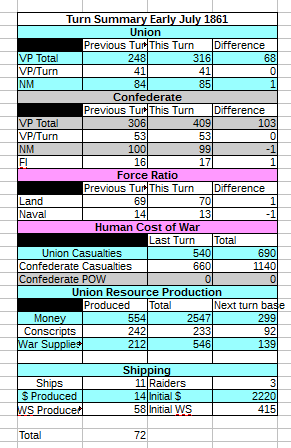

Currently writing:
The Coming Fury - an excessively detailed AAR on Union strategy
The Coming Fury - an excessively detailed AAR on Union strategy
-
Cardinal Ape
- General of the Army
- Posts: 619
- Joined: Wed Mar 07, 2012 1:59 am
Re: 13. Early July 1861
principes romanes wrote:I note that my two commanding officers with field victories to their name are Butler and Patterson.
Noice. I'm sure it was all due to Butler's skill rather then Evans being deep into the bottle. Anyhow, I've always had a strange amusement for getting victories with horrible commanders. Good job. So, next up is Banks? Good luck.
-
principes romanes
- Sergeant
- Posts: 89
- Joined: Tue Oct 11, 2016 9:32 pm
- Location: Genève
14. Late July 1861
14. Late July 1861
There were two small surprises this turn. One at Fort Monroe and the other on the Mississippi.
East
First, Evans and Magruder did not combine their forces for an assault on Monroe. I may have a chance to run some reinforcements in. I suspect that my fleet will get highly beaten up doing so, but I am quite happy that Butler is distracting a sizable Confederate force that could otherwise be giving McDowell a hard time.
I mentioned last turn that I have some reinforcements available this turn. I decided to send them to Washington instead of directly into the front lines. If I have enough reinforcements, I may be able to order them to rail into McDowell's army while the former is marching to Manassas, allowing me to gain an unexpected numerical superiority to win the battle.
Longstreet also moved to Falmout, probably to drive my scouting cavalry out. This reminded me that I do not yet have a flotilla blocking the Potomac from river crossings.
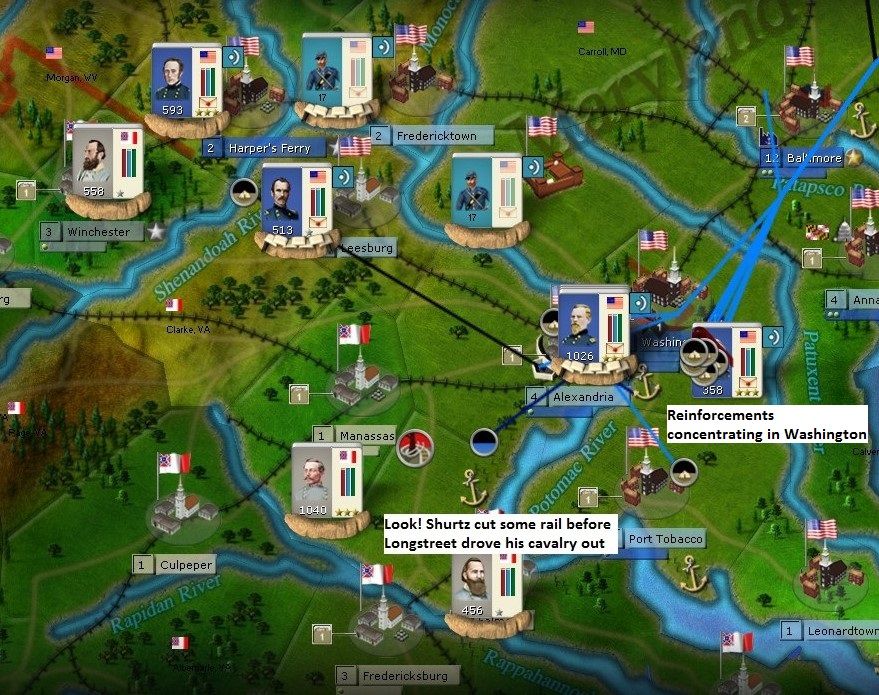
In West Virginia, Floyd and Wise are retreating. I have some cavalry attempting to hamper Floyd's retreat path but I suspect those forces will be able to make it safely across the mountains.
West
The second surprise was that Kansas Mounted Volunteers moved South from Charleston, MO to New Madrid. This was only a surprise because I thought I had cancelled the order. Fortunately, they also surprised me by actually driving the defending militia out of the region. I will take advantage of having some military control in the region (67%) to send a force from Cairo along the river to land and contribute to the siege.
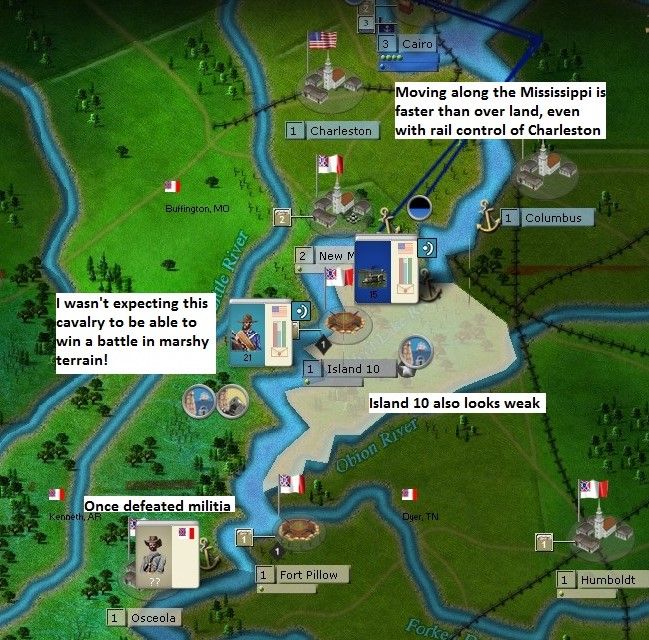
I have a large number of reinforcements coming to Cairo, including some artillery I forgot I built. Cairo is currently fairly weakly defended but I suspect the threat I currently pose to Island 10 is a reasonable defense.
In Missouri, Lyon is at Springfield, besieging its militia garrison. The Rolla militia retreated back towards Jefferson City, cutting Lyon's supply route. His resupply plan is to take Springfield.
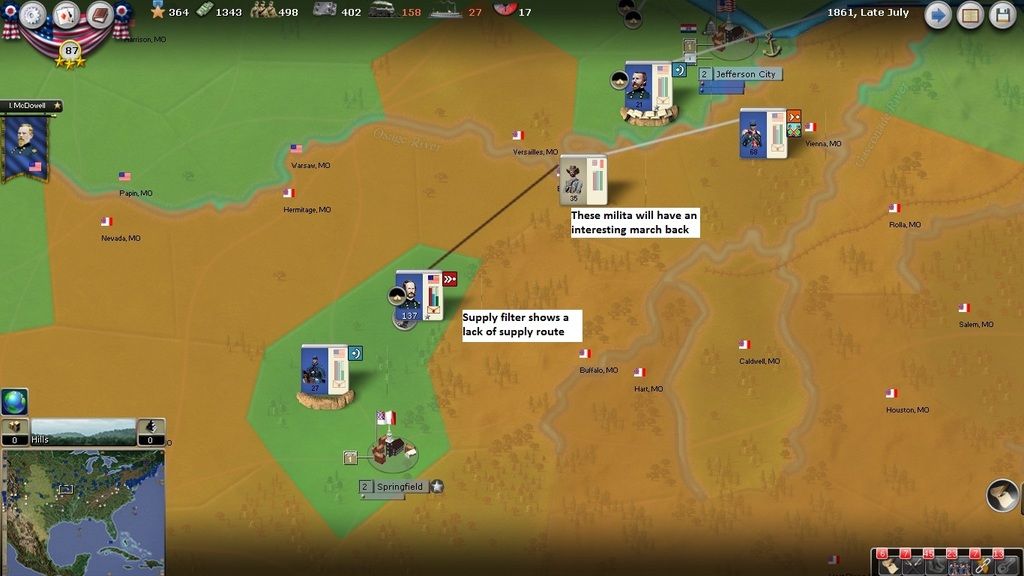
In the far West, I seem to have started raiding before the South. I expect that my rangers in Texas will soon face some opposition, so I hope to quickly destroy enough stockades to cut the supply line to El Paso.
Reinforcements and Other
In invested in rail and river transport this turn. I held off last turn so that my WS would be high enough to automatically convert some of it into money. This turn I was both desperate for the improved capacity (after orders, my rail capacity was 158 – very limited [which I think means enough to use rail in one of the three supply movement phases] – and my river capacity was 27 – nil) and I was already going to be low on WS.
My builds this turn were mostly infantry. I held off on artillery this turn both to conserve WS and because I already have a lot under production. I have included a summary of how I've spent my money so far this game.
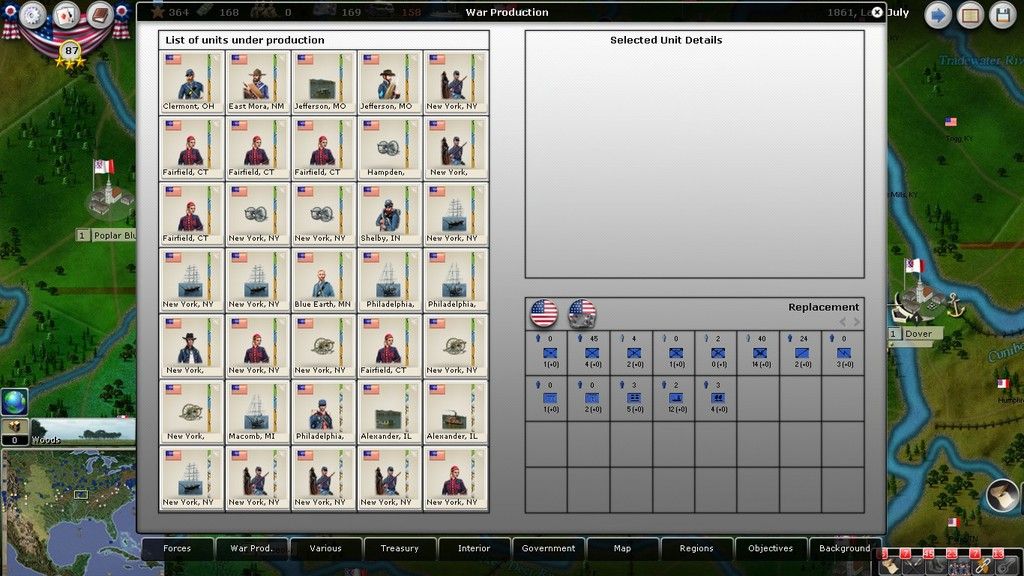
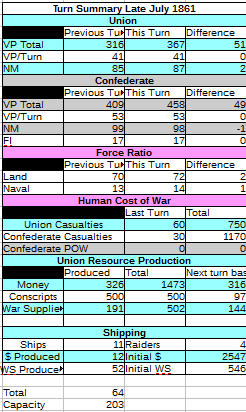


Currently writing:
The Coming Fury - an excessively detailed AAR on Union strategy
The Coming Fury - an excessively detailed AAR on Union strategy
-
loki100
- AGEod Guard of Honor
- Posts: 2401
- Joined: Sun Aug 14, 2011 4:15 pm
- Location: Caithness
- Contact: Website Twitter
Re: The Coming Fury: A Union AAR by principes romanes
again, thanks for doing this ... its invaluable as a walk through of the early game options with the US
Who is online
Users browsing this forum: No registered users and 20 guests