August saw some fighting, a lot of aggressive manouvering and the end of the 'waiting' phase of the war. This post finishes with a brief discussion on how I use the various 'stances', again those interested in just the AAR can ignore that
France
Now I have 4 corps at Wesel its time to try and hassle Frederick. My plan is to keep one corps at Wesel, send two to Dulmen and the fourth to stay one province north. In effect the centre will involve a battle with all 4 formations, on the flanks with 3 (due to the 'march to the sound of the guns' mechanic).
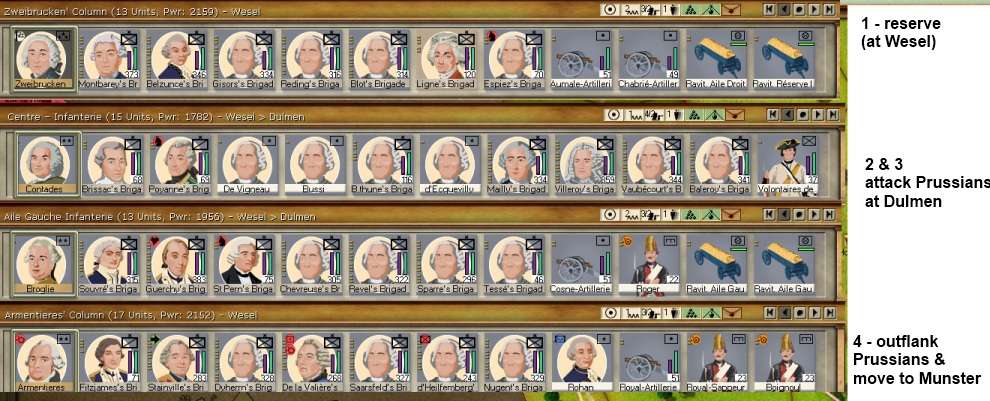
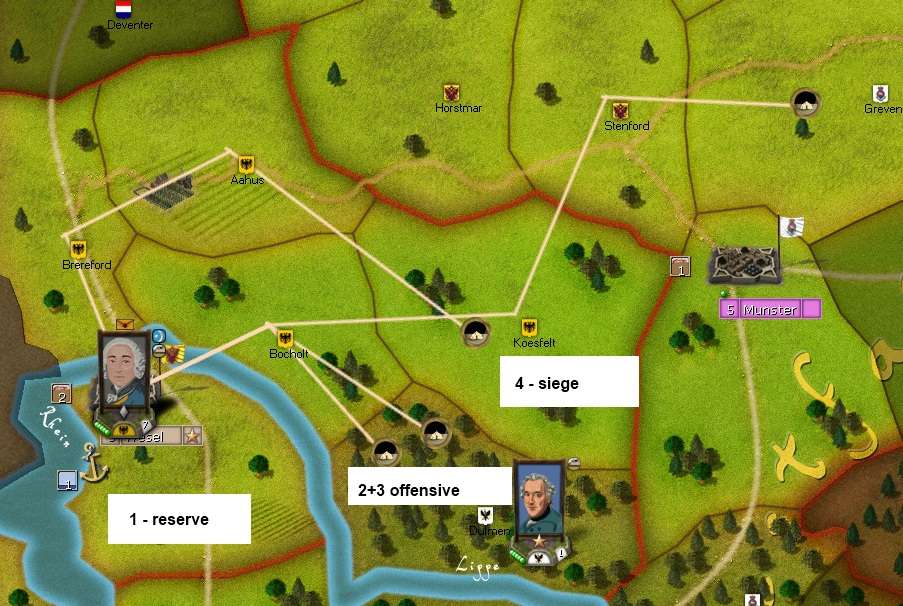
A key part to this is that each corps is in the stance of defend at all costs, not attack. My logic is that if some have attack orders I am vulnerable to a corps commander going inert at a critical stage and being hit piecemeal. That stance will trigger battle and if I win, I hold the ground, even if I advanced into the province. It will take 17 days to reach Dulmen (2 & 3 are inactive) but at no stage is any corps isolated. So even if Frederick guesses correctly, he'll have a 1 hour advantage and then the bulk of the army will respond.
As it is, he wasn't there when I arrived.

I suspect Narwhal was probing for a weakness at Wesel or to catch something weak around Dusseldorf. Well I'm content to complete my move. Once I have the central portion deployed in Dulmen, Armentieres can move onto Munster (since Dulmen is adjacent, he'll be perfectly safe).
I doubt the Prussians will go for Wesel as if it fails, & it will given my stance (even if Narwhal 'wins' the battle), the column will be very vulnerable to being encircled. So I guess he'll fall back towards Hamm or try to defend Munster.
North
In the north, there is much less movement. The siege at Stalsrund carries on in its leisurely manner and Narwhal clears my last HRE held cities out. Again, very little I can do about this.
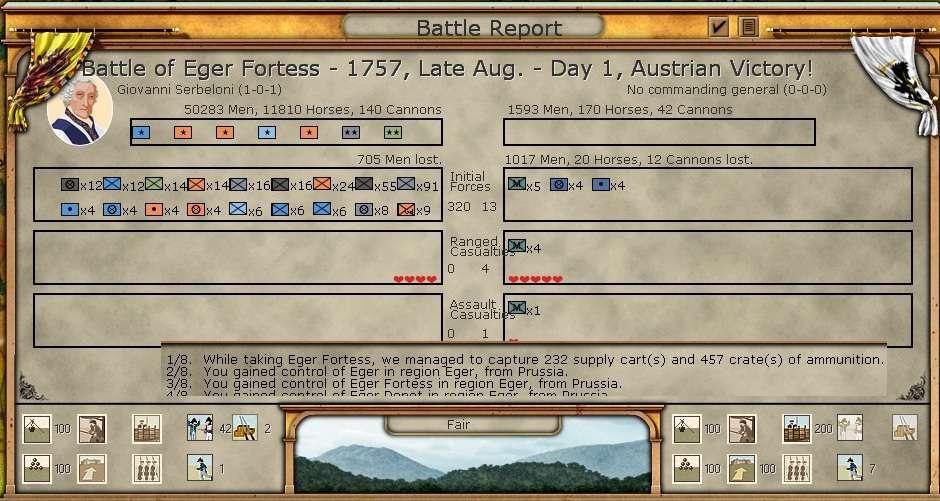
More importantly, 3rd Division does what it is designed to do, and by late August I have a breach at Koenigsberg. With some luck it should be mine by the end of September and I can redeploy the Russian army to Gdansk before winter sets in.
 Bohemia
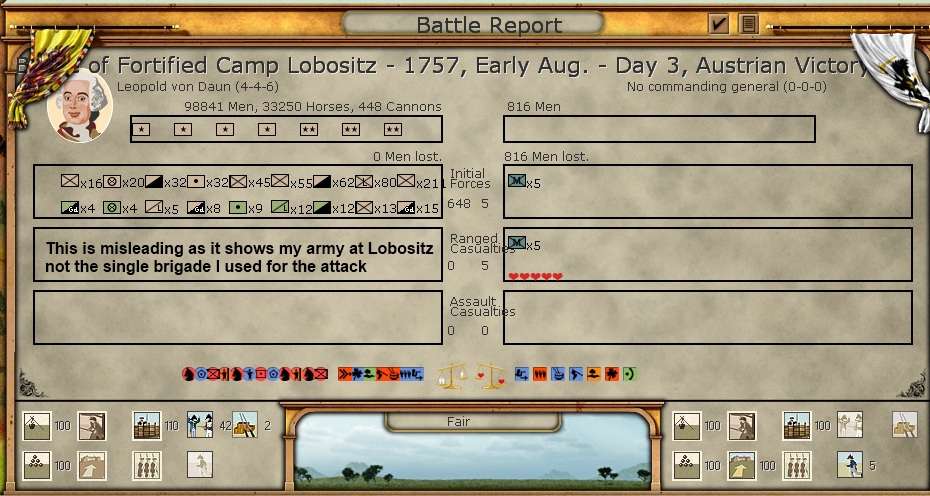
By early August, I risk putting a single brigade into an offensive stance as I want the depot at Lobositz.
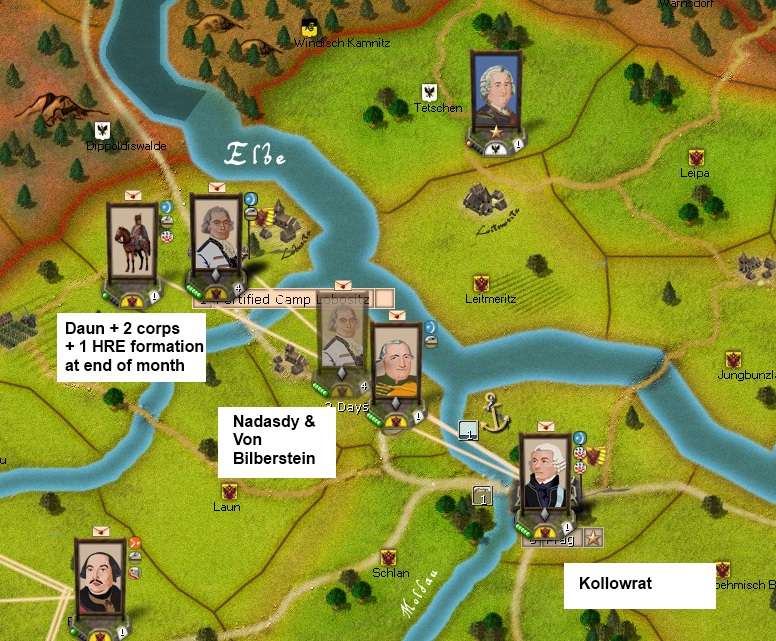
However, I also decided on a major re-organisation of my defence structure to avoid Kollowrat being isolated. My new structure has 6 corps (once Hohenzollern arrives), with at worst 3 corps self-supporting, at best all 6. Also the Elbe is a major barrier to a contested crossing as it is a major river.
Hohenzollern will arrive at Lobositz by the end of August and will be integrated into Daun's army. Originally my plan was to use this 6 corps force to move into Saxony, in the event, given the disaster on the Oder (below), I ordered Hohenzollern over to the east to reinforce Charles.
Equally by the end of August, Eger had been retaken, so I am well placed to move into Saxony before the winter snows block the roads.
Between Daun's 6 corps and the 3 in the HRE force, I have around 180,000. Even if I send 20-30,000 over to the Oder, I think that gives me a degree of security to now push onto Dresden.
So, we turn our attention to the bad news section. Not least I seem to have taken no useable screenshots (blame panic).
The (bad) Oder
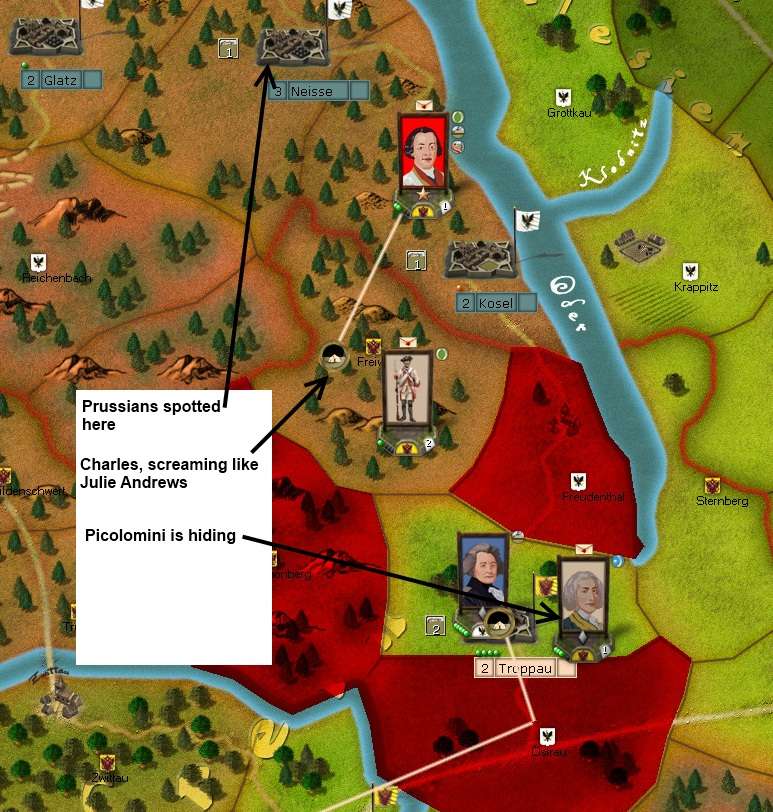
At the start of August, my scouting Hussars spotted a Prussian corps under von Moritz hiding in Neisse. Now I have intermittent Cossack scouts to the north, so my guess was this was the Prussian cavalry with no infantry (I think I would have spotted a force moving at infantry speed in better time).
So, I ordered Charles to fall back to Troppau, but if this was cavalry he wasn't going to make it in time. So he went into the most passive of stances, if he was caught hopefully he'd retreat with minimal losses. Picolomini has arrived at Troppau. I didn't fancy his chances in open battle so I put him in the fort. If this was a cavalry force, they had no means to prosecute a long siege.
In the event, 2 infantry battalions were caught at Troppau (I'd forgotten to cancel its orders), and yes, it was von Moritz with a purely cavalry corps.
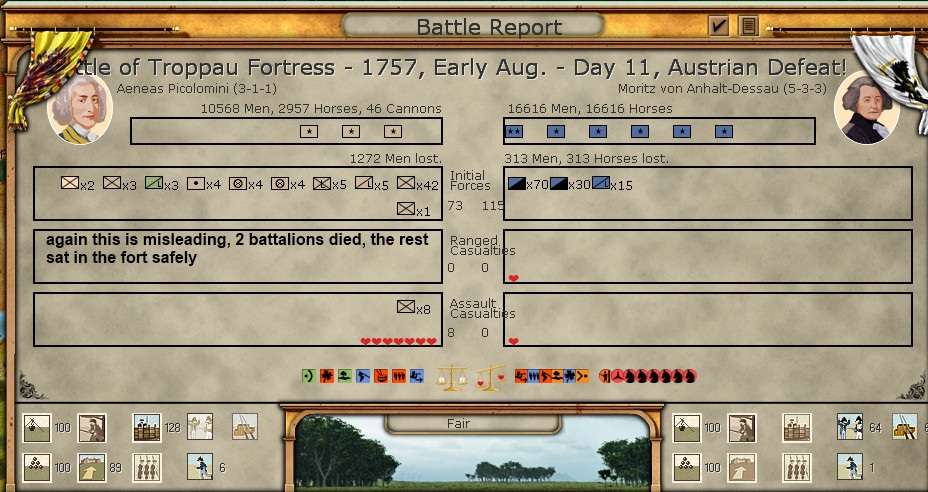
Fortunately, Charles had managed to run up a mountain squeeling like
Julie Andrews. But he, and the valuable siege guns, are very vulnerable, for the moment Picolomini is safe.
This is bad but redeemable. What I can't afford to lose is the siege guns (they are the only ones in the Austrian army) as not only would that hamper me, it would give the Prussians the means to conduct a siege.
But clearly my attempt to wage a campaign on the cheap and at speed on the Oder has failed. My next step is to decide how much of the force now with Daun in Northern Bohemia I need to deploy over here. Not just to sort out this mess, but commence the fortress campaign with some security.
Some comments on stances.
Stances are one of the complex bits of the AGEOD system. Now the manual and the tool tips do a good job of telling you what each does, but are less use in guessing what to do and when. So these are some rough ideas that I have worked out and make some sense to me.
You have a very passive stance (you can see this with Charles in the last screenshot, the little indicator is green). Usually I use this for scouting (don't want to be seen, don't want to fight), however, as with Charles above it can be useful for a combat force too. If you know you are going to lose, it tends to make you run away very quickly (if you are really lucky, as I was, even on contact). So its not a bad idea to preserve a force in deep trouble, as long as you retreat somewhere you can escape from it can be very useful.
You have 4 defensive stances (this shows as a blue indicator). These range from don't retreat unless you are routed to falling back after 1-2 rounds. The first for the Austrian side is incredibly useful if you need to hold on (eg if the Prussians attack Prag). Oddly it can be quite aggressive too, if you enter a province and a battle breaks out and you don't rout, you either trigger a multi-day battle (till one side loses enough organisation) or you end up holding a province that your opponent originally had.
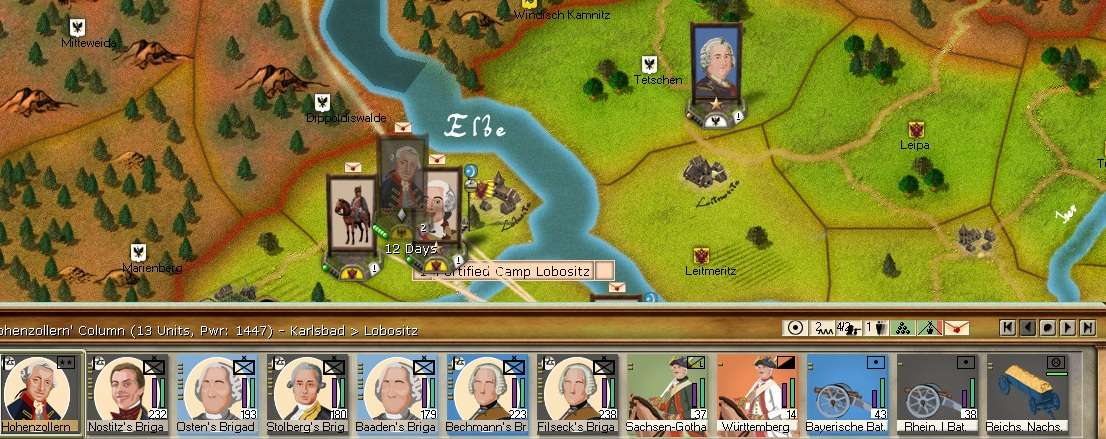
You have 4 attack stances (orange). Again they range from 'probe-fall back' to 'all out attack'. Really depends on how desparate you are to take a province and how many losses you are prepared to suffer. One use of the probe-fall back stance is to give it to Hussars or Cossacks when you are reasonably confident they won't be in proper action. That way they both scout and take military control (& really muck up the Prussian supply lines). It was the widespread 'abuse' of this (by me) that we solved by a houserule, you can only go into this stance with light cavalry if there is also a leader present. You can see an example in the screenshot of Lobositz, that weak Austrian force in the lower corner is a 'brigade' of Hussars reclaiming military control (and thus reinstalling the fog of war).
There is an 'all out assault' stance (the red button at the top of the screen). In Wars in America, this allows you to attack structures on the move or at the end of the turn. In RoP, since most cities have some sort of fort, this is less valuable. One use of this stance is if you expect to gain a critical breach in the next turn (ie you have 1 breach on a 2 level fort etc). If you gain a second breach in the turn resolution phase you can launch an immediate all out, attack to the death, assault. Guess what 3rd Division is now ordered to do, in case I manage a second breach at Koenigsberg in early September?


